The Secret to the Best Grilled Corn on the Cob
Do you know the secret to the best grilled corn on the cob? It’s not just about tossing some corn on a grill and hoping for the best; it’s an experience, a revelation that dances between tradition and innovation. The aroma of sweet kernels caramelizing on those hot grates is utterly intoxicating. As you take your first bite, the warm juiciness bursts into a symphony of flavors, wrapping around your taste buds like a cozy blanket. This isn’t merely food; it’s a connection to summer evenings spent outdoors, laughter mingling with the rich scent of charred goodness wafting through the air. I promise you, once you master this technique, grilled corn will become your go-to side dish for every gathering.
This recipe has been passed down through generations in my family. We’ve always gathered around the grill during summer barbecues, sharing stories and soaking up the sun while waiting for that perfect moment to enjoy our golden treasures. What makes this grilled corn truly special is not just its flavor but its versatility—it can be dressed up with spices or kept simple with just butter and salt, allowing it to shine in its natural glory. Whether it’s a Fourth of July cookout or a casual weeknight dinner, this dish brings people together and creates memories worth savoring.
The Secret to the Best Grilled Corn on the Cob: A Summer Essential
Let me share with you my cherished recipe for grilled corn on the cob—a simple yet profound delight that elevates any meal and fills your heart with joy. This isn’t just about achieving perfectly cooked corn; it’s about creating an experience that resonates deeply within you and your loved ones.
Ingredients:
As we embark on this culinary journey together, let’s dive into each ingredient that contributes to making this grilled corn so remarkable.
- 6 Ears Yellow Corn (or white sweet corn). When selecting corn, look for ears with bright green husks tightly wrapped around the cobs. The kernels should be plump and milky when pierced—this indicates freshness and sweetness. Yellow corn is particularly sweet and juicy but feel free to experiment with white sweet corn if you prefer a milder flavor. A key tip: try to cook your corn as soon as possible after purchasing it; once harvested, sweet corn begins converting its sugars into starches rather quickly.
- 2 Tablespoons Kosher Salt. This salt serves not only as seasoning but also plays an essential role in enhancing all those natural flavors of the corn. Kosher salt has larger grains compared to table salt, making it easier to control how much you’re using while cooking. Trust me on this—salting the water helps draw out moisture from the kernels, resulting in a more concentrated sweetness when grilled.
- 3 Tablespoons Ground Sea Salt (fine). Using fine sea salt allows for even distribution over your freshly grilled corn. It dissolves quickly when sprinkled over buttered kernels, ensuring every bite bursts with savory flavor without overwhelming your palate. While you could use regular table salt if needed, I recommend opting for high-quality sea salt because it adds depth to each bite.
- 3 teaspoons Sugar. You might be surprised to find sugar in our ingredient list! This ingredient acts as a flavor enhancer that balances out any residual bitterness from grilling and amplifies the inherent sweetness of our corn. Sprinkle it alongside that fine sea salt right before serving for an exquisite contrast that will leave everyone craving more.
- Butter (unsalted). Butter is where we bring everything together! Unsalted butter allows us complete control over seasoning—this way we can adjust flavors without worrying about excess sodium from salted varieties. When slathered onto hot grilled corn, that butter melts into every crevice like liquid gold, creating an indulgent layer that makes each bite profoundly satisfying.
Equipment You’ll Need:
Having the right tools makes all the difference in our culinary adventure! While these may not be ingredients themselves, they are essential partners in bringing our delicious creation to life.
- Grill (Gas or Charcoal). Your grill will be your best friend here! A medium heat is crucial for achieving those perfect char marks while allowing the inside of the kernels to cook through without burning them. If you’re using charcoal, make sure it’s evenly distributed beneath your grate for consistent heating.
- Tongs or Grill Forks. These tools are necessary for handling hot ears of corn safely without damaging them or getting too close to flames—safety first! Look for tongs with good grip and length so you can easily turn those cobs without feeling like you’re playing a game of hot potato.
- Large Bowl or Sink (for soaking). Soaking our corn before grilling is key! Use either a large bowl or clean sink filled with cool water mixed with kosher salt; this step hydrates our kernels while infusing them with flavor before they hit those sizzling grates.
Step 1: Preparing Your Corn
Start by pulling back the husks of each ear of corn carefully while ensuring they remain attached at one end—the husk acts like a protective cloak during grilling! Remove all strands of silk nestled between those beautiful golden kernels because nobody wants stringy bits when indulging in such delightful bites later on (trust me!). Once cleaned up nicely, pull those husks back up around their precious cobs; we want them protected but also showcasing their vibrant color!
Step 2: Salty Soak
Now comes one of my favorite steps—filling your sink or bowl with cool water and adding in kosher salt until dissolved completely! Submerge those prepared ears of corn into this brine bath for about 10-20 minutes—this process allows our cobs to soak up moisture and absorb flavor from that lovely salty solution before hitting heat! Don’t rush this step; patience pays off when we’re after juicy results later!
Step 3: Prepping Your Grill
While our ears are soaking happily away in their briny bath, let’s get that grill fired up! Preheat it to medium heat which gives us optimal conditions for roasting—too high might scorch those beautiful kernels before they’ve had time to soften fully inside! If using charcoal, wait until coals are glowing red before placing them beneath your grate; think even cooking across all surfaces!
Step 4: Grilling Perfection
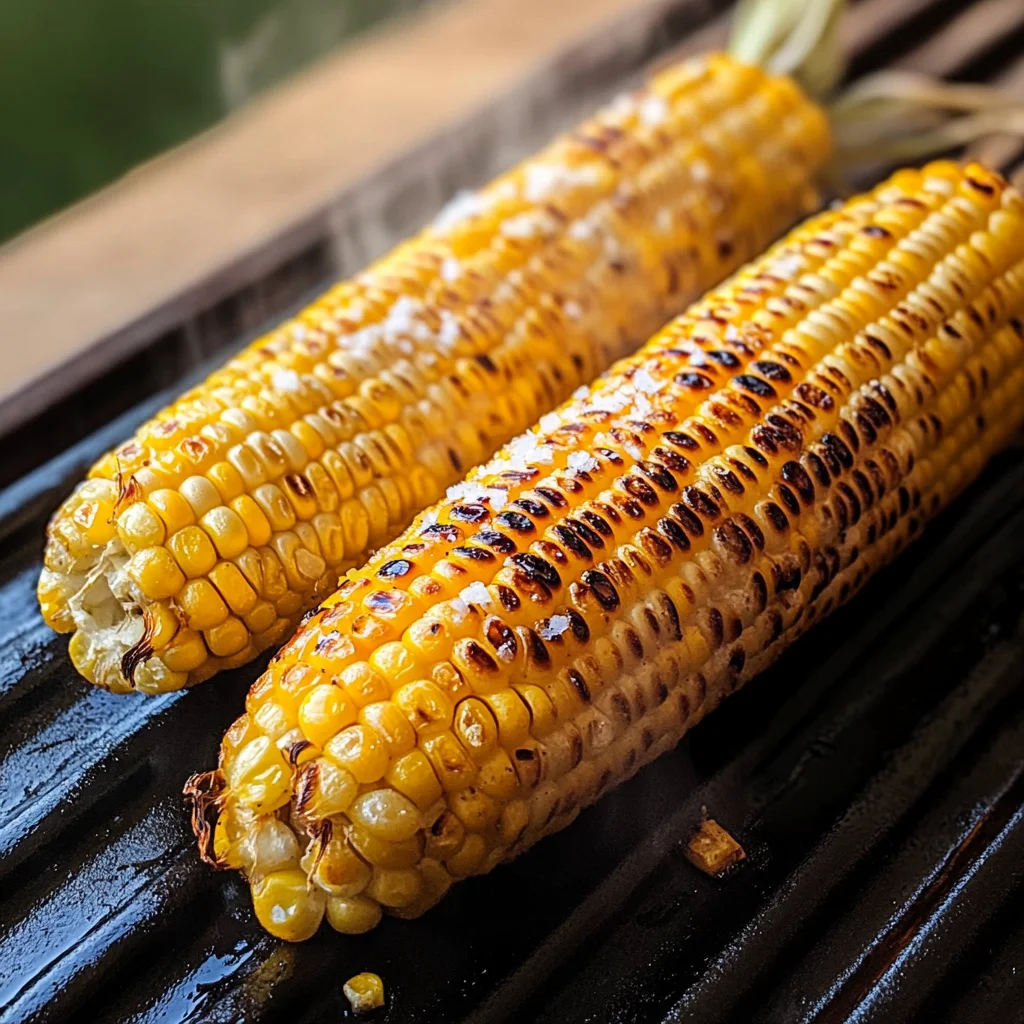
Once our grill reaches temperature perfection and we’ve shaken any excess water off from soaking (we don’t want steam instead of delicious smoke), place those well-prepped ears directly onto grates spaced apart enough so they aren’t overcrowded—this ensures even cooking all around! Grill them for approximately 15-20 minutes total while rotating every five minutes; watch closely as they transform into vibrant golden beauties ready for indulging!
This process is crucial since grilling allows sugars within each kernel caramelize beautifully while keeping inside tender—a true labor of love resulting in utter satisfaction later on!
Now just imagine biting into sweetly charred goodness topped off generously with melted butter mixed generously with our delightful salt-sugar blend… So good!
Stay tuned as we move forward into assembling these gorgeous creations into something extraordinary…
The Secret to the Best Grilled Corn on the Cob: A Dance of Flavor and Technique
Oh, the anticipation of biting into a perfectly grilled ear of corn! There’s something so delightfully nostalgic about this summertime staple that instantly transports me to sun-soaked picnics and backyard barbecues. The secret to the best grilled corn on the cob isn’t just about throwing it on the grill; it’s about coaxing out those rich, sweet flavors and ensuring a tender bite that’s bursting with juiciness. So, let’s dive deeper into each step together, shall we?
Step 5: The Art of Seasoning – Creating Flavor Magic
Once your corn has been grilled to perfection, it’s time for one of the most crucial steps: seasoning. In a small bowl, mix together your fine ground sea salt and sugar in a ratio that will elevate the natural sweetness of the corn. I like to use three tablespoons of fine ground sea salt to three teaspoons of sugar because this combination creates an utterly intoxicating contrast that makes every bite sing. This step is not just about flavor; it’s about creating layers that enhance what you’ve already built with grilling.
Now, take your beautifully charred corn and slather it generously in unsalted butter while it’s still warm—this allows for the butter to melt into every nook and cranny, creating a luscious coating that binds all those flavors together. Trust me on this; there’s nothing more satisfying than watching that golden butter trickle down as you prepare to indulge. Don’t be shy with the butter or the seasoning; it’s all about personal taste! Just remember, what you sprinkle on now will determine how each mouthful resonates with flavor later.
Step 6: The Final Grill – Locking in Flavors
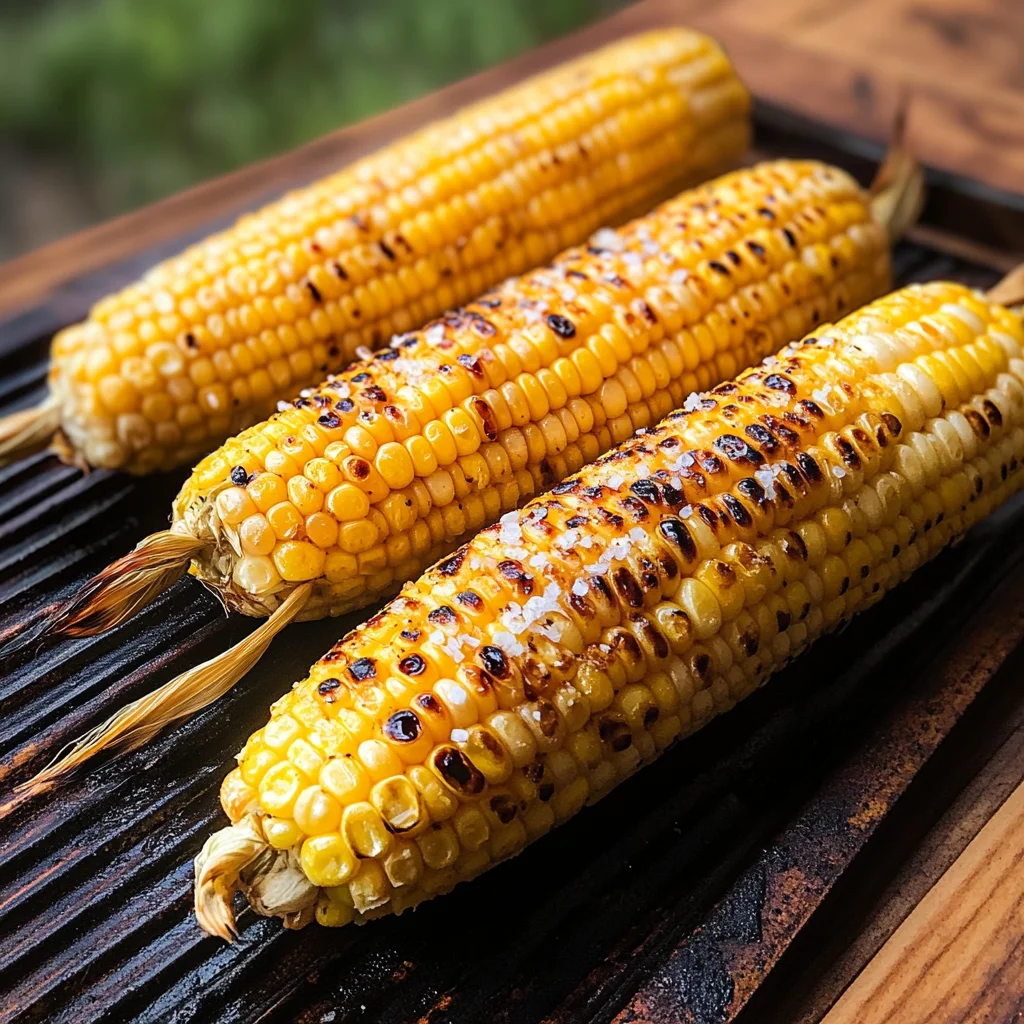
Now we’re going back to our trusty grill for one last dance! After applying your butter and seasoning mixture, return the corn to the grill for an additional 2-3 minutes over medium heat. This final grilling period is absolutely paramount because it helps caramelize those sugars in the butter and salt mixture while simultaneously allowing them to meld into the kernels, creating a complex flavor profile that’s both sweet and savory.
As you watch those kernels continue to toast slightly, keep an eye out for visual cues—the steam rising from the ears will be an indication that they are soaking up all those delicious flavors. You want them sizzling just enough without burning; a touch of char is great for adding depth but avoid letting any dark spots turn into bitterness. Remember, patience is key here: don’t rush this step! Enjoy watching your creation transform right before your eyes.
Step 7: Plating Perfection – The Presentation Matters
Once you’ve achieved that final charred goodness on your ears of corn, it’s time to think about presentation—a step often overlooked but essential for elevating any dish from simple to extraordinary. Using tongs (to avoid burns), gently place each ear onto a serving platter or wooden board. Arrange them artistically; perhaps fanning them out or stacking them slightly askew for an inviting display that beckons everyone at your gathering.
Now comes the fun part—additional toppings! Consider offering optional toppings like zesty lime wedges or fresh herbs such as cilantro or parsley for some brightness against that rich buttery backdrop. My friends love adding a sprinkle of chili powder or even crumbled cheese if they want something extra special! Engaging all senses here—from sight to smell—makes your grilled corn not just food but a delightful experience everyone will remember.
Step 8: Enjoying Every Bite – The Moment We’ve All Been Waiting For
Finally, we arrive at the moment we’ve all been waiting for—the first bite! As you sink your teeth into that perfectly grilled ear of corn, expect an explosion of flavors: buttery richness complemented by savory saltiness mixed with subtle sweetness from both the corn itself and that little sprinkle of sugar. Each kernel bursts with juice as you chew, releasing a symphony of tastes that will leave you craving more.
But let’s not forget one crucial aspect—taking time to savor this delicious creation is non-negotiable! Gather around your loved ones; share stories while nibbling at these kernels fresh off the grill. It’s not just about eating; it’s about connecting over something beautiful created through patience and care in cooking together. I promise you’ll find joy in every delicious bite!
With each step meticulously followed, you’ve unlocked The Secret to the Best Grilled Corn on the Cob—a recipe that’s sure to become a cherished favorite at gatherings far beyond summer BBQs. So dig in and relish every moment! 🍽️✨
Storage and Enjoyment Tips for Your The Secret to the Best Grilled Corn on the Cob
Now that you’ve grilled up a batch of this incredible corn, it’s time to dive in and relish each juicy bite! But what if you’re lucky enough to have some leftovers? Don’t worry; I’ve got you covered with tips to keep that delightful flavor alive for days to come. Trust me when I say that enjoying this corn doesn’t have to end at the grill; it can extend into your week with just a bit of proper care.
Storing Leftover The Secret to the Best Grilled Corn on the Cob
To keep your leftover grilled corn fresh and tantalizing, start by wrapping each ear snugly in aluminum foil or placing them in an airtight container. It’s essential to store them in the refrigerator, where they’ll stay happy for about three to five days. If you want to keep them even longer, here’s a little pro tip: place a slice of bread in the container with the corn! This clever trick helps maintain moisture levels while preventing that dreaded dryness that can sometimes set in. After storage, the corn retains its sweet, smoky essence but may lose a bit of its crispness—don’t fret! A quick reheating on the grill or stovetop will revive those flavorful kernels beautifully. Alternatively, you can enjoy them cold straight from the fridge, adding a refreshing crunch to salads or salsas.
Freezing The Secret to the Best Grilled Corn on the Cob for Later
If you find yourself with more corn than you can eat within a few days, freezing is an excellent option that locks in all that deliciousness! To freeze your grilled corn effectively, first allow it to cool completely. Then, wrap each ear tightly in plastic wrap or aluminum foil before placing them in a freezer-safe bag or container. Ensure as much air is removed as possible before sealing—this prevents freezer burn and keeps your corn tasting fresh. When stored properly, your grilled corn can last up to six months in the freezer! When you’re ready to enjoy it again, simply take out an ear and let it thaw in the fridge overnight or warm it directly from frozen on the grill for that fabulous charred flavor once more. Isn’t it wonderful how convenience meets flavor?
The Secret to the Best Grilled Corn on the Cob
Grilled corn on the cob is a quintessential summer delight that evokes memories of sun-soaked gatherings and delicious BBQs. This recipe transforms sweet, juicy corn into a flavor-packed experience through a simple yet effective grilling technique. With every bite, you’ll enjoy the rich caramelization of sugar complemented by savory butter and just the right touch of seasoning. Whether served at a festive cookout or as a casual weeknight side, this grilled corn will be the highlight of your meal. Discover how easy it is to elevate your summer gatherings with this irresistible dish!
- Prep Time: 10 minutes
- Cook Time: 20 minutes
- Total Time: 30 minutes
- Yield: Serves 6
- Category: Side Dish
- Method: Grilling
- Cuisine: American
Ingredients
- 6 ears yellow or white sweet corn
- 2 tablespoons kosher salt
- 3 tablespoons fine ground sea salt
- 3 teaspoons sugar
- Unsalted butter (for serving)
Instructions
- Prepare the corn by removing husks and silk, then pull husks back over the cobs.
- Mix cool water with kosher salt in a large bowl or sink. Soak the corn for 10-20 minutes.
- Preheat your grill to medium heat.
- Shake off excess water from soaked corn and place it directly on the grill grates.
- Grill for 15-20 minutes, turning every five minutes until kernels are tender and slightly charred.
- Remove from grill, slather with unsalted butter, and sprinkle with fine sea salt and sugar before serving.
Nutrition
- Serving Size: 1 ear of grilled corn (approximately 150g)
- Calories: 150
- Sugar: 5g
- Sodium: 210mg
- Fat: 5g
- Saturated Fat: 2g
- Unsaturated Fat: 2g
- Trans Fat: 0g
- Carbohydrates: 26g
- Fiber: 3g
- Protein: 5g
- Cholesterol: 0mg