Dubai Chocolate Balls with Pistachio Kunefe Filling
There’s something utterly enchanting about the process of creating desserts that not only satisfy your sweet tooth but also tell a story. The Dubai Chocolate Balls with Pistachio Kunefe Filling are more than just a treat; they are a delightful blend of textures and flavors, each bite reminiscent of warm gatherings and cherished memories. As you roll these decadent little balls, filled with an irresistible pistachio cream and enveloped in rich dark chocolate, you’re not just cooking—you’re crafting an experience. The delicate kataifi pastry, with its crispiness juxtaposed against the smooth chocolate and nutty cream, creates a symphony of flavors that will transport you to bustling markets in Dubai, where the air is fragrant with sweetness.
What makes this recipe truly special is its ability to bridge tradition and innovation. Drawing inspiration from the traditional kunefe dessert, these chocolate balls take a familiar favorite and give it a modern twist that’s perfect for any occasion—especially during the festive season! I promise you, once you serve these to your friends or family, they will be asking for more. With each ball filled with luscious pistachio and coated in velvety chocolate, it’s hard not to fall head over heels for this treat. So let’s embark on this delightful culinary journey together, shall we?
Dubai Chocolate Balls with Pistachio Kunefe Filling: Decadence Meets Tradition
Welcome to the world of indulgence! Today, we’re diving into making some remarkable Dubai Chocolate Balls with Pistachio Kunefe Filling—a treat that beautifully marries crunchy pastry with creamy pistachio filling and rich dark chocolate. This recipe is ideal for those who want to impress at gatherings or simply enjoy a bit of self-care through baking.
Ingredients:
As we prepare to make our decadent Dubai Chocolate Balls with Pistachio Kunefe Filling, it’s essential to gather our ingredients thoughtfully. Each component plays a significant role in creating this delicacy, so let’s explore what we’ll need.
- 7 ounces kataifi pastry (a.k.a. kunefe). This delicate shredded pastry is crucial for providing the signature texture that sets our chocolate balls apart. When toasted properly, kataifi becomes wonderfully crispy, adding an incredible crunch that contrasts beautifully with the creamy filling inside. You’ll find kataifi in Middle Eastern grocery stores or specialty food shops—look for brands that use quality wheat flour for optimal results.
- 1/3 cup butter. Butter acts as a binding agent while also enriching flavor throughout our dessert. I recommend using unsalted butter so you can control the saltiness of your dish better; plus, it gives that luscious mouthfeel we crave in desserts like these chocolate balls. Make sure your butter is softened at room temperature before use—this helps achieve a smoother consistency when mixing.
- 5.3 ounces white chocolate. White chocolate brings a delightful sweetness and creaminess to our filling while balancing out the nuttiness of the pistachios perfectly. When selecting white chocolate, aim for high-quality bars rather than chips; they often contain more cocoa butter which melts beautifully and enhances flavor.
- 1.5 teaspoons neutral-tasting vegetable oil (avocado or corn oil) (optional). Adding oil helps create an even creamier texture in your pistachio filling, making each bite melt in your mouth. If you skip this step, don’t worry—it will still taste divine without it!
- 5.3 ounces natural pistachio butter (or roasted and unsalted pistachio nuts). Pistachio butter is what adds that luxurious nutty flavor to our filling; if using whole nuts instead, be sure to grind them until they reach a smooth consistency similar to peanut butter! Quality matters here—go for raw or lightly roasted nuts without added salt for the best flavor.
- 1 pinch of salt. It may seem minimal, but a pinch of salt elevates all those sweet flavors and balances out the richness of the chocolate and nuttiness of the pistachios beautifully.
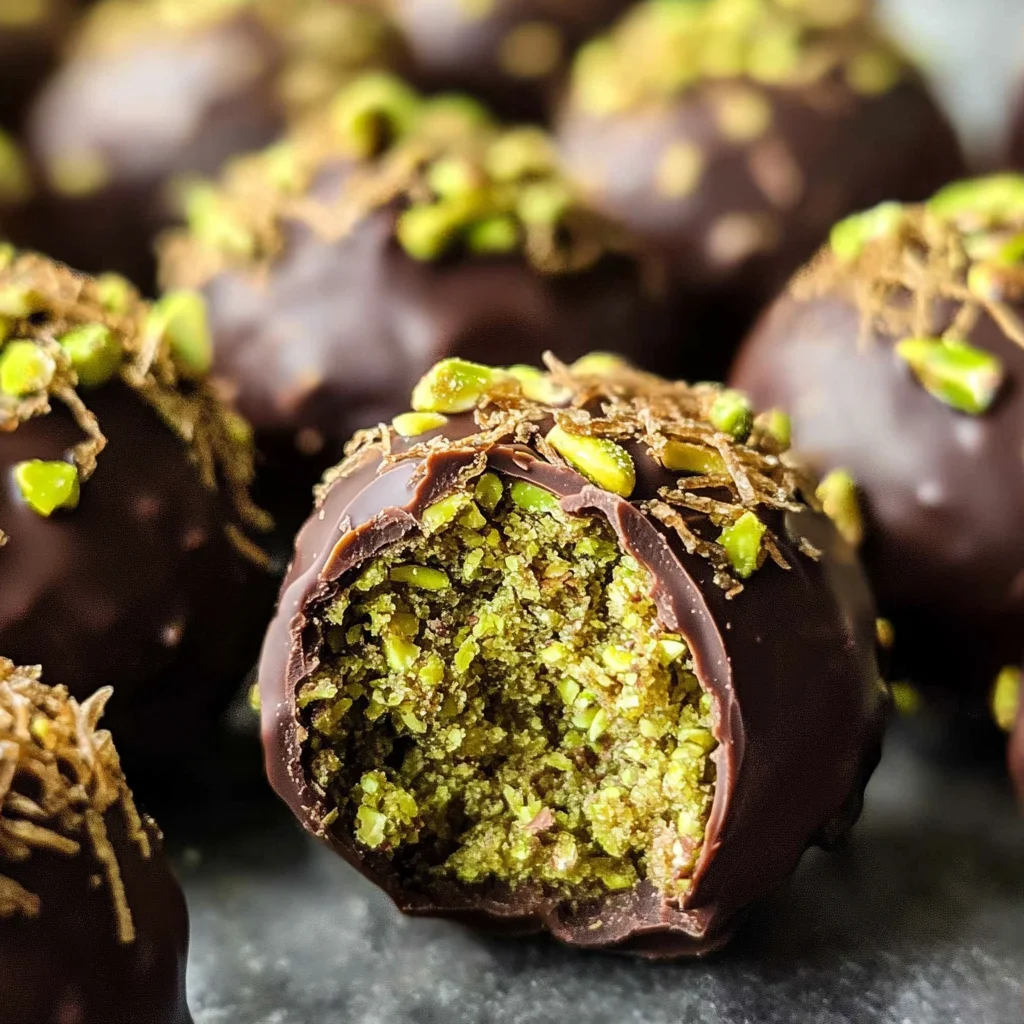
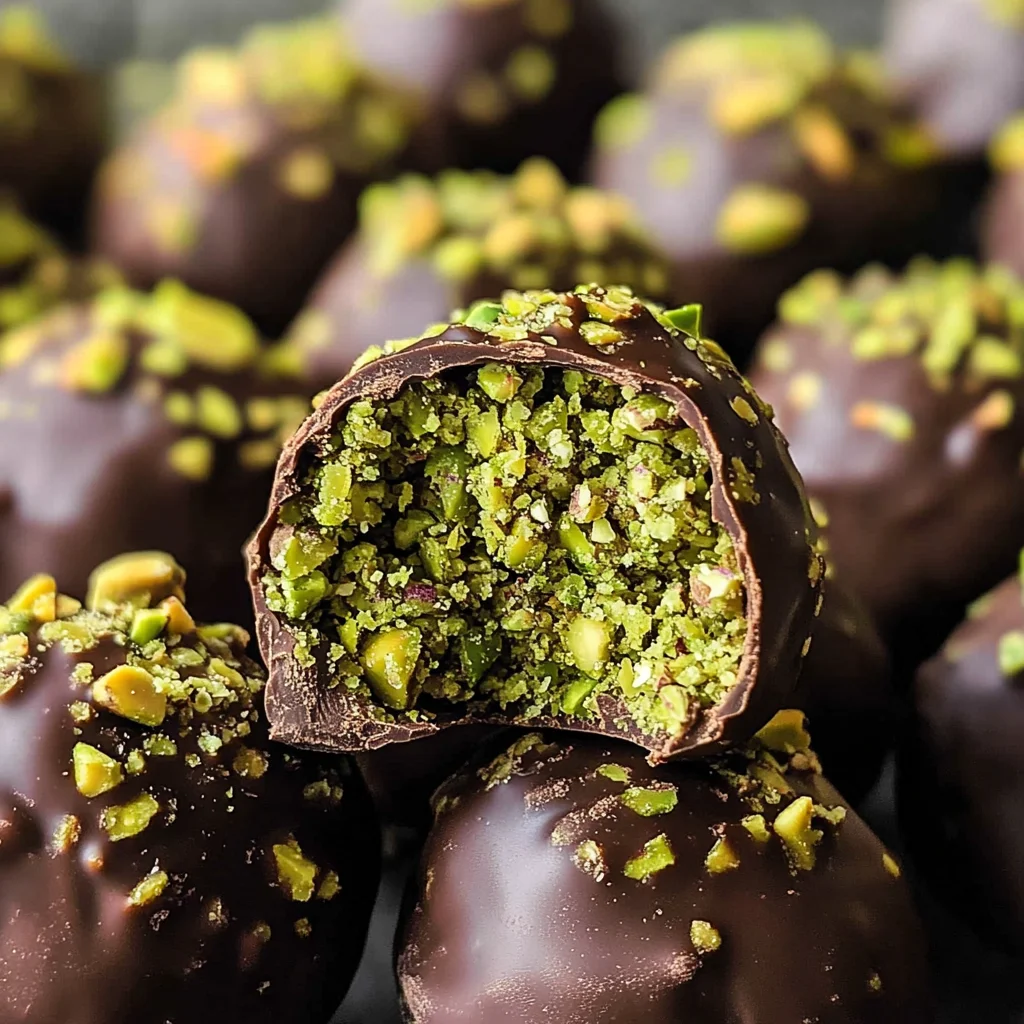
- 14.1 ounces dark chocolate (55-65% cocoa) melted and tempered—this is our outer coating! Dark chocolate not only adds depth but also pairs wonderfully with the sweet interior we’re crafting here. Tempering your chocolate ensures it has that beautiful sheen and satisfying snap when bitten into—a non-negotiable step for professional-looking results!
- 3 tablespoons chopped pistachios (for decoration) adds both visual appeal and additional crunch on top of our truffles. They’re like little emeralds on top of rich jewels—who could resist?
Equipment You’ll Need:
Now that we’ve gathered our ingredients, let’s talk about some essential tools you’ll want by your side while creating these delightful treats! Having the right equipment makes all the difference in ensuring everything runs smoothly—from mixing to molding—and ultimately leads to delicious results.
- Mixing bowls – A set of various sizes is essential as we’ll need them for combining ingredients at different stages throughout our recipe. Opt for glass or stainless steel bowls since they are durable and won’t retain odors or stains over time—a worthy investment for any kitchen!
- Heatproof spatula – This handy tool is perfect for mixing melted ingredients without damaging them or leaving behind residue like wooden spoons might do! A good spatula allows you excellent control over your mixtures as well as easy scraping down sides when necessary.
- Parchment paper or wax paper – You’ll need this when placing your formed truffles onto trays before serving! Not only does it prevent sticking but also makes cleanup a breeze afterward—that’s always something we appreciate!
- Double boiler (or microwave-safe bowl) – Whether melting your chocolates gently using steam or quick bursts in the microwave method; both require careful monitoring! If using microwave method take utmost care not to scorch—chocolate can easily seize up if overheated!
- Forks – You’ll want two forks handy during dipping process; they help ensure an even coating while also preventing messy fingers! Plus they allow you maneuverability when rolling balls into melted dark chocolate efficiently!
With all these components ready at hand let’s dive into preparing our Dubai Chocolate Balls with Pistachio Kunefe Filling together!
Step 1: Toasting Your Kataifi Pastry
The first step in this enchanting journey begins with preparing our kataifi pastry—a process that involves chopping it into smaller pieces about one inch long before fluffing it thoroughly by hand to separate those delicate strands fully! This step is vital because it allows us maximum surface area when we toast it later on. Once you’ve done this, transfer both chopped kataifi and butter into a pot over medium heat; watch closely as they transform together! Stir constantly until golden brown—the aroma wafting through your kitchen will have everyone buzzing with anticipation! It’s important not to rush this step; patience here yields wonderfully crispy strands which add texture later on within each indulgent ball.
Step 2: Melting White Chocolate
While your kataifi cools completely after achieving perfect crispness (trust me—you’ll want every bit!), let’s focus on melting white chocolate next! In a heatproof bowl—or alternatively using double boiler method—combine white chocolate alongside optional neutral oil if desired; remember: adding oil enhances creaminess within filling! Melt gradually either via microwave in short bursts or over simmering water until smooth—the key here lies in gentle heating since too high temperatures can lead towards unmanageable clumps rather than silky liquid gold goodness required later on—the result will be worth every moment spent waiting!
Step 3: Mixing Pistachio Cream
Now comes one of my favorite parts: combining melted white chocolate with natural pistachio butter along with just a pinch of salt! This mixture creates what I refer affectionately as “pistachio cream”—a deeply satisfying blend full of flavor complexity perfect as filling inside each truffle ball we’re crafting today! Mix until well combined—it should have an appealingly smooth consistency resembling thick batter-like texture once done correctly—then set aside allowing it cool completely whilst reminding yourself how wonderful patience really pays off within baking endeavors!
Step 4: Incorporating Toasted Kataifi
Once everything has cooled sufficiently down from previous steps—we can finally introduce crispy kataifi strands into luscious pistachio cream mixture now awaiting incorporation! Gently fold them together until evenly combined—I find using spatula works wonders here since helps avoid breaking apart delicate strands too much whilst ensuring thorough distribution throughout entire batch—it should feel light yet cohesive overall once completed successfully! If mixture appears runny instead fear not; simply pop into refrigerator briefly till firm enough shape individual balls easily without collapsing under pressure later on during coating phase ahead…
I hope you’re feeling just as excited about diving into this process as I am! Stay tuned as we continue shaping our delectable Dubai Chocolate Balls with Pistachio Kunefe Filling next…
Dubai Chocolate Balls with Pistachio Kunefe Filling
Oh, my dear friends, we are diving into a world of sweet delights with these Dubai Chocolate Balls with Pistachio Kunefe Filling! Trust me when I say this is one of those recipes that will make your heart sing and your taste buds dance. The combination of rich chocolate and the nutty, buttery flavor of pistachios enveloped in a crispy, golden kunefe pastry is an experience you simply cannot miss. Let’s continue on this delicious journey together!
Step 5: Forming the Irresistible Chocolate Balls
Once you’ve chilled your mixture to the right consistency, it’s time to put in a little love and shape those heavenly bites! Start by using a kitchen scale to measure out approximately 1.1 ounces (30 grams) of the pistachio-kataifi mixture for each ball. This precision ensures that they all cook evenly and look delightful on the plate. Remember, this isn’t just about aesthetics; uniformity in size leads to consistent texture and flavor throughout every single ball. As you roll them between your palms, take a moment to feel the delightful texture—each one should be firm yet slightly yielding, thanks to the kataifi threads blending with the creamy filling.
Lay these little spheres on a tray lined with parchment or wax paper—this step is crucial because it prevents sticking and makes cleanup a breeze later on. Once they’re all nestled together like little gems waiting to be transformed, pop them into the freezer. Yes, my friend, this chilling phase is absolutely paramount! Freezing them for about 30 minutes allows the flavors to meld beautifully while ensuring that they hold their shape during the next glorious step of chocolate coating. Plus, who doesn’t love a bit of patience when it leads to such divine results?
Step 6: The Enveloping Embrace of Dark Chocolate
Now comes one of my favorite parts—the glorious dipping process! You’ll want to have your melted dark chocolate ready and waiting for those frozen beauties. Using two forks (or even your hands if you’re feeling adventurous), gently dip each frozen ball into the warm chocolate bath, rolling it around until it’s completely enveloped in that luscious liquid gold. This part is where magic happens; as the chocolate cools against the chilled balls, it creates a beautiful shell that will crack ever so slightly when you take your first bite—a moment I assure you will be nothing short of spectacular.
But let’s not rush this step—take your time! Ensure each ball is well-coated by letting any excess chocolate drip back into your bowl before placing them carefully back onto the prepared tray. This is where you can also get creative: sprinkle them with chopped pistachios while still wet for an added crunch and visual appeal that screams elegance! Don’t skip this; those vibrant green flecks not only enhance flavor but also elevate your dessert’s presentation from ordinary to extraordinary.
Step 7: Setting Your Masterpieces
After all those delightful balls are coated and decorated, it’s essential to let them rest so that everything sets perfectly. Find a cozy spot in your kitchen or dining area where you can place these tempting treats without disturbance. Ideally, allow them to sit at room temperature for about 15-20 minutes or until they’re set but still soft enough to indulge in right away! However, if you’re feeling particularly patient—and I encourage you to be—you can pop them back into the fridge for an hour or two. This extra chilling time helps firm up that glossy chocolate coat while intensifying all those divine flavors you’ve coaxed from each ingredient.
As they chill and set, take a moment to admire your handiwork—the shiny surface glistening under light is utterly intoxicating! I promise you; witnessing this transformation will fill you with immense satisfaction because you’ve poured love into every step.
Step 8: The Final Touches of Perfection
Now that our Dubai Chocolate Balls are lovingly set and ready for their grand debut, let’s talk about presentation! When you’re ready to serve these decadent delights (and trust me; everyone will be eagerly waiting!), arrange them artfully on a beautiful platter—perhaps garnished with additional chopped pistachios or even edible flowers if you’re feeling fancy!
Remember that serving them at room temperature allows all those flavors to shine through beautifully; there’s nothing quite like biting into one of these treasures while enjoying the carefully balanced sweetness mingling with that nutty creaminess. They’re perfect for any occasion—birthdays, holiday gatherings, or simply as an indulgent treat after dinner.
And there you have it—your own batch of Dubai Chocolate Balls with Pistachio Kunefe Filling! Each bite is truly extraordinary—a symphony of flavors and textures that will undoubtedly leave everyone asking for more. Don’t forget to savor each moment as much as each bite; after all, cooking is about creating memories just as much as it is about enjoying delicious food!
So gather around friends and family; it’s time to share this delightful creation and bask in compliments galore! Happy cooking!
Storage and Enjoyment Tips for Your Dubai Chocolate Balls with Pistachio Kunefe Filling
Now that you’ve crafted these divine little treats, it’s time to dive into the delightful world of storing and enjoying your Dubai Chocolate Balls with Pistachio Kunefe Filling. Trust me when I say, these decadent bites are not just for immediate indulgence; they can also be savored over several days, making them a perfect treat for any occasion! You’ll want to make sure you preserve their luscious texture and flavor, so let’s chat about how to do just that.
Storing Leftover Dubai Chocolate Balls with Pistachio Kunefe Filling
To keep your leftover chocolate balls in tip-top shape, the best practice is to place them in an airtight container. This will create a cozy environment that prevents them from drying out or absorbing unwanted odors from your fridge. If you find yourself with extras (which is often hard to believe because they’re so irresistible), these beauties can last up to a week in the refrigerator without losing their charm. However, if you want to maintain their freshest taste and texture, try adding a slice of bread into the container; it acts like a little moisture sponge! The flavor only deepens as they sit, transforming each bite into an even more profound experience. And if you ever find yourself reaching for one after a couple of days, you’ll still get that glorious crunch from the kataifi pastry paired with the creamy pistachio filling. When you’re ready to enjoy again, just plate them up and relish each morsel!
Freezing Dubai Chocolate Balls with Pistachio Kunefe Filling for Later
Freezing these delightful chocolate balls is another fantastic way to ensure you always have a sweet treat on hand! Simply arrange the balls on a baking tray lined with parchment paper and pop them in the freezer until they’re firm. Once frozen solid, transfer them into an airtight container or a zip-lock bag to protect them from freezer burn. They’ll stay fresh for up to three months — talk about a convenient solution for unexpected guests or when that chocolate craving hits! When you’re ready to indulge again, there’s no need for thawing; just grab one straight from the freezer! As it sits at room temperature for just a few minutes, you’ll notice that the chocolate begins to soften while maintaining its delightful crunchiness—creating an utterly intoxicating experience that feels like magic every time.
Dubai Chocolate Balls with Pistachio Kunefe Filling
Indulge in the exquisite delight of Dubai Chocolate Balls with Pistachio Kunefe Filling—a no-bake treat that combines rich dark chocolate with a creamy pistachio center, all encased in crispy kataifi pastry. This recipe is not only perfect for festive gatherings but also ideal for satisfying your sweet cravings at any time. Each bite offers a delightful contrast of textures and flavors, transporting you to the enchanting streets of Dubai with every mouthful. Whether you’re looking to impress your guests or simply enjoy a gourmet dessert at home, these chocolate balls are sure to be a hit!
- Prep Time: 30 minutes
- Cook Time: 15 minutes
- Total Time: 45 minutes
- Yield: Approximately 12 servings 1x
- Category: Dessert
- Method: No-Bake
- Cuisine: Middle Eastern
Ingredients
- 7 ounces kataifi pastry
- 1/3 cup unsalted butter
- 5.3 ounces white chocolate
- 1.5 teaspoons neutral vegetable oil (optional)
- 5.3 ounces natural pistachio butter or roasted pistachios
- 1 pinch of salt
- 14.1 ounces dark chocolate (55-65% cocoa), melted
- 3 tablespoons chopped pistachios (for decoration)
Instructions
- Preheat your oven to 350°F (175°C). Chop kataifi into small pieces and fluff it up.
- In a pot over medium heat, combine kataifi and butter, stirring until golden brown.
- Melt white chocolate using a double boiler or microwave until smooth.
- Mix melted white chocolate with pistachio butter and salt until creamy.
- Fold in toasted kataifi strands gently until well combined.
- Shape the mixture into balls (about 1 ounce each) and freeze for 30 minutes.
- Dip chilled balls in melted dark chocolate, coating evenly, and decorate with chopped pistachios.
- Let set at room temperature or refrigerate until firm.
Nutrition
- Serving Size: 1 serving
- Calories: 120
- Sugar: 10g
- Sodium: 20mg
- Fat: 9g
- Saturated Fat: 4g
- Unsaturated Fat: 5g
- Trans Fat: 0g
- Carbohydrates: 10g
- Fiber: 1g
- Protein: 2g
- Cholesterol: 10mg