Red, White And Blue Bars
There’s something truly magical about the simplicity of baking. It’s not just about mixing ingredients; it’s about creating warmth, evoking memories, and sharing love through every delectable bite. Today, I want to share with you a recipe that captures the spirit of celebration: Red, White and Blue Bars. Imagine biting into a soft, tender bar that bursts with the vibrant colors of red velvet and sweet candies—it’s more than merely a treat; it’s an experience that brings people together. Each layer is a reminder of summer picnics, family gatherings, and festive occasions where joy fills the air, making it impossible not to smile.
The beauty of these bars lies not just in their striking appearance but in their taste—a delightful marriage of rich chocolatey undertones from the red velvet cake mix harmonizing with the crunchy sweetness of M&Ms. These bars are perfect for any occasion, whether it’s a Fourth of July barbecue or a casual weekend get-together with friends. They are easy to whip up yet feel so special that they could be the highlight of any dessert table. Trust me when I say this simple recipe will quickly become one of your go-to favorites!
Red, White And Blue Bars: A Sweet Celebration in Every Bite
Let’s dive into this joyful journey together! Making these Red, White and Blue Bars is as enjoyable as indulging in them. With just a handful of ingredients and straightforward steps, you’ll create something truly extraordinary that will leave everyone asking for seconds.
Ingredients:
As we embark on this delightful culinary adventure, let me walk you through each ingredient you’ll need to create these vibrant bars. Each component plays an essential role in crafting that perfect taste and texture we’re aiming for.
- 1 oz standard size Red Velvet Cake Mix (I used Duncan Hines 16.5). This magical mix is the heart and soul of our bars, providing that rich chocolate flavor with hints of vanilla that define red velvet desserts. The convenience of using a cake mix saves time without compromising on flavor or tradition—something I absolutely cherish! If you’re feeling adventurous or prefer homemade alternatives, you can create your own red velvet cake mix with cocoa powder, flour, sugar, baking soda, and a touch of salt. However, trust me when I say this pre-made mix ensures consistent results every time.
- 1/2 cup butter (melted; 1 standard size stick). Butter is like liquid gold in baking; it adds richness and moisture while helping create that tender crumb we adore in our bars. Melting the butter before mixing allows for easier incorporation into our batter while enhancing the overall flavor profile. If you’re looking for alternatives due to dietary preferences or restrictions, consider using coconut oil or vegan butter—both options work beautifully without sacrificing taste.
- 2 eggs. Eggs are non-negotiable when it comes to baking—they bind our ingredients together while providing structure and moisture. In this recipe, they help achieve that chewy texture we all crave when indulging in dessert bars. Always use room temperature eggs for optimal mixing; if you forget to take them out beforehand, simply place them in warm water for about five minutes before cracking them open!
- 1 M bag Red (White & Blue) M&Ms candies (other varieties can be used as well or omitted). These colorful candies bring joy in both appearance and taste! Their crunch contrasts beautifully with the soft texture of the bars while adding delightful pops of sweetness throughout each bite. You can absolutely substitute with chocolate chips or other candy varieties if you’re feeling creative—or even omit them entirely if you prefer a more classic bar!

Equipment You’ll Need:
Having the right tools is key to ensuring our baking experience is as smooth as possible! While they may not be ingredients, these essential partners will help us create something wonderful.
- 13×9-inch baking pan – This size is paramount because it allows us to bake our bars evenly while also providing enough surface area for delightful crispy edges—the best part! If you don’t have one on hand, a similar-sized dish will suffice; just keep an eye on baking times as they may vary slightly.
- Aluminum foil – Lining your baking pan with foil makes cleanup a breeze while also ensuring your bars don’t stick to the bottom. Plus, it helps retain moisture during baking—who doesn’t love soft treats?
- Non-stick cooking spray – A light misting before pouring in your batter acts as an additional insurance policy against sticking! It’s such an easy step but makes all the difference when serving up those beautiful slices.
Now that we’ve gathered our ingredients and equipment let’s jump into preparing these spectacular Red, White And Blue Bars!
Step 1: Preheat Your Oven to Perfection
Before diving into mixing your ingredients, preheating your oven is crucial—it sets the stage for even cooking throughout! Aim for 350 degrees F (175 degrees C) because anything lower could lead to undercooked centers while higher temperatures might dry out those beloved edges we all adore. Trust me on this step: don’t rush it! Your oven needs time to warm up properly so those bars can rise beautifully.
Step 2: Prepare Your Baking Pan
While waiting for your oven’s gentle hum to signal readiness, let’s prep our baking pan. Line it with aluminum foil—this small detail means less mess later on—and lightly spray it with non-stick cooking spray for added assurance against sticking. You want every delicious crumb freed from its confines when it’s time to serve!
Step 3: Combine Your Ingredients
In a large mixing bowl—one big enough to accommodate all those luscious ingredients—combine your red velvet cake mix with melted butter and eggs. Using a spatula or wooden spoon works wonders here; gently fold everything together until no dry cake mix remains visible—you’re aiming for a thick batter consistency here that’s almost gooey yet still holds itself together nicely! As you stir away, take note of how invitingly fragrant it becomes—totally intoxicating!
Step 4: Add Those Colorful Candies
Now comes my favorite part—mixing in half of those vibrant M&Ms! Stir them gently into your batter; this step is important because you’ll want some candy pieces distributed evenly throughout but still save enough to sprinkle atop later on for added visual appeal once baked! As you fold them in carefully—not too vigorously—you’ll notice their colors brighten up what was once just a bowl full of red velvet goodness!
Continue following these steps until you’ve reached a natural stopping point where we can savor this process together before moving on to bake these beauties!
I can’t wait until we reach that moment where these tantalizing treats come out of the oven golden brown and ready for slicing! Keep going strong—you’ve got this!
Step 5: The Art of Baking to Perfection
Now comes the moment we’ve all been waiting for—the baking! It’s time to slide our beautifully mixed batter into the preheated oven, set at a cozy 350 degrees Fahrenheit. This temperature is absolutely paramount because it allows the bars to rise gently without drying out or becoming too tough. As you place your pan in the oven, take a deep breath and savor that moment. You’ll soon be enveloped in a warm, sweet aroma that will beckon friends and family from every corner of your home.
You’ll want to keep a close eye on these Red, White And Blue Bars as they bake for approximately 15 to 20 minutes. It’s crucial not to over-bake them; the key here is to pull them out when they’re just set in the middle but still slightly soft. If you poke them gently with your finger, they should spring back—a gentle bounce is what we’re looking for! As they cool, they’ll firm up beautifully, creating that perfect chewy texture that’s utterly irresistible. Trust me on this: patience is key, so resist the urge to dive in too soon!
Step 6: Cooling Down—The Sweet Anticipation
Once your bars have reached that golden moment of doneness, it’s important to let them cool before slicing into them. Take them out of the oven and place them on a cooling rack if you have one handy; if not, just let them sit in their pan for about 10-15 minutes. Cooling is an essential step, allowing the crumb structure to stabilize and making slicing much easier later on. Plus, think of all those heavenly scents wafting through your kitchen—how could you rush through this?
During this cooling period, feel free to prepare for the grand unveiling! You might want to find your sharpest knife—this will ensure clean cuts when it’s time to slice into these delightful bars. If you can resist temptation long enough to allow them to cool completely (which can take around 30 minutes), you’ll be rewarded with perfectly structured pieces rather than a gooey mess—a situation we definitely want to avoid!
Step 7: Slicing with Love
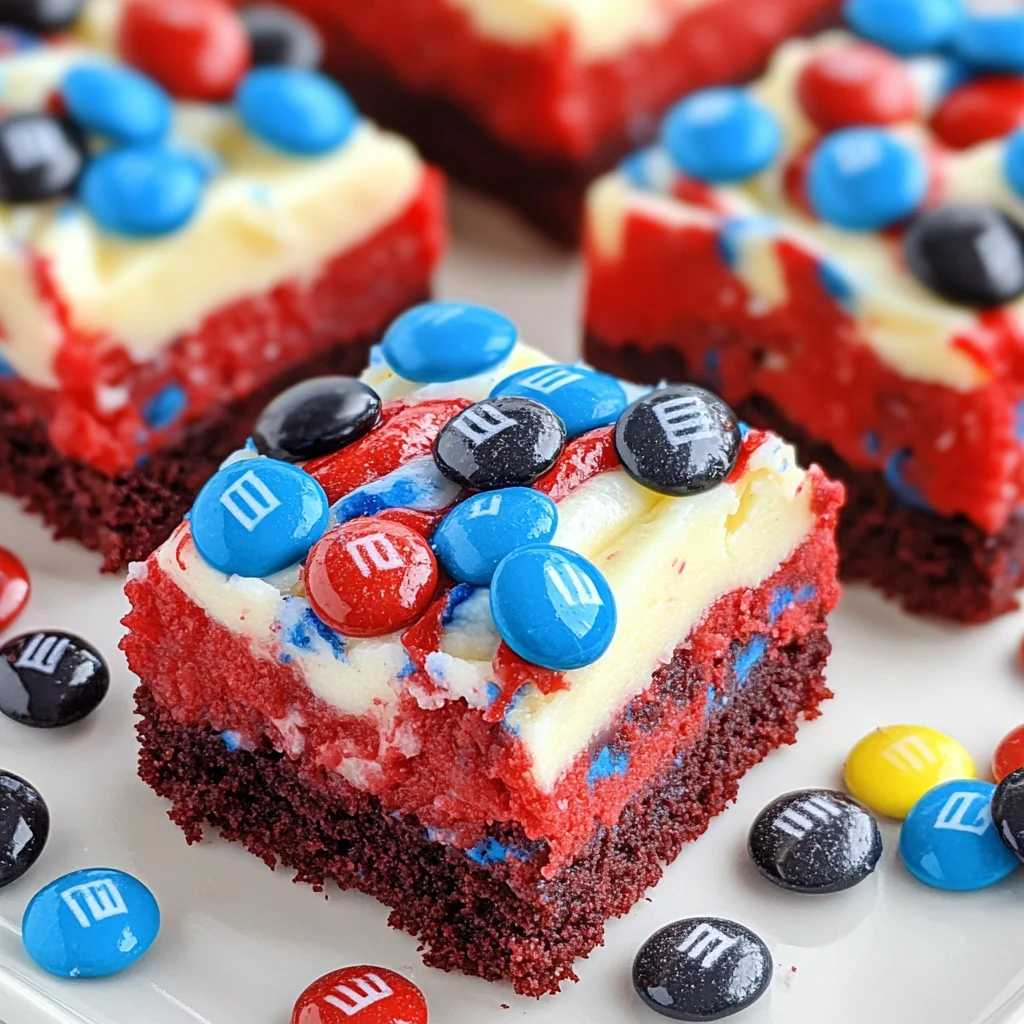
Now that your Red, White And Blue Bars have had their cooling time, it’s finally time for my favorite part—slicing! Grab your knife and gently cut into those bars; I recommend cutting them into squares or rectangles depending on how generous you want each serving to be. Each slice reveals layers of rich red velvet interspersed with colorful M&Ms—it’s like unwrapping little treasures!
When cutting, use a gentle sawing motion rather than pressing down hard; this preserves their beautiful shape while ensuring each piece remains intact and delightful. You’ll notice how soft and moist they are inside—the result of our careful baking process—and how inviting those vibrant candies look against the deep red backdrop. This visual contrast isn’t just pretty; it also hints at the burst of sweetness you’ll experience in every bite.
Step 8: The Grand Moment—Serving Your Creation
Your kitchen has been transformed into a haven of warmth and sweetness, and now it’s time for the grand finale: serving these delightful Red, White And Blue Bars! As you present them on a beautiful platter or even just on a simple paper towel for casual gatherings, take a moment to appreciate all the love and care you’ve put into this recipe. The colors are vibrant; that intoxicating smell still lingers in the air like an embrace from an old friend.
I highly encourage you to serve these bars at room temperature; this allows all those flavors to shine through beautifully. If you’re feeling adventurous (and I know you are!), consider drizzling some melted white chocolate over the top or sprinkling a touch of powdered sugar for extra flair—these little touches make all the difference! Remember that sharing good food brings people together; so invite friends or family over and watch their faces light up as they take their first bite. It’s truly extraordinary how food has this incredible ability to create memories and connections.
Conclusion:
As we wrap up our delightful journey through making these Red, White And Blue Bars together, I can’t help but feel a surge of excitement about sharing this recipe with you! It’s truly extraordinary how such simple ingredients can come together to create something so vibrantly unique and satisfying. The combination of rich red velvet cake mix with those colorful M&Ms creates not only a feast for the eyes but also an explosion of flavors that dance on your palate. Each bite reveals layers of sweetness complemented by subtle chocolate notes—it’s an experience that goes beyond mere indulgence!
I wholeheartedly believe this recipe is a must-try! Not only because of its taste but because it brings joy into your kitchen as you create something special with your own hands. Picture pulling those warm bars from the oven; the aroma wafting through your home is enough to draw family and friends into the kitchen like moths to a flame! These bars are perfect for any occasion—be it Fourth of July celebrations filled with laughter or cozy winter nights curled up on the couch. They’re versatile enough to suit festive gatherings or casual weekend treats while always bringing smiles aplenty!
Imagine savoring one alongside a steaming cup of coffee in the morning or treating yourself to one after dinner as dessert—a true pick-me-up any time of day! For an afternoon delight, pair it with some vanilla ice cream—a scoop melting luxuriously over that soft bar is nothing short of heavenly. Or perhaps serve one on its own at your next picnic alongside some fresh fruit; it will shine amongst all other offerings while becoming everyone’s favorite dish!
Feeling adventurous? This recipe is wonderfully adaptable! You could swap out those M&Ms for chopped nuts or dried fruits if you’re looking for different textures—imagine how delightful walnuts would be nestled amongst those moist crumbs! Or why not try adding swirls of cream cheese frosting on top right before baking? The possibilities are endless! I encourage you to put your own spin on these Red, White And Blue Bars and let your creativity flow freely. Share your variations with friends and family—let’s transform this beloved recipe into something uniquely yours as we celebrate our shared love for baking together!
Red, White And Blue Bars
Experience the joy of baking with these vibrant Red, White And Blue Bars. This easy recipe combines the rich flavor of red velvet cake mix with colorful M&Ms, creating a delightful treat perfect for any occasion—from summer barbecues to festive gatherings. Each bite offers a soft, chewy texture and bursts of sweetness that evoke memories of joyful celebrations while bringing family and friends together. With just a few ingredients and straightforward steps, you can whip up these bars in no time, making them an instant favorite at your dessert table. Let’s get baking!
- Prep Time: 10 minutes
- Cook Time: 20 minutes
- Total Time: 30 minutes
- Yield: About 12 servings 1x
- Category: Dessert
- Method: Baking
- Cuisine: American
Ingredients
- 1 oz Red Velvet Cake Mix (like Duncan Hines)
- 1/2 cup melted butter (or coconut oil)
- 2 eggs
- 1 M bag Red (White & Blue) M&Ms (or chocolate chips)
Instructions
- Preheat your oven to 350°F (175°C). Prepare a 13×9-inch baking pan by lining it with aluminum foil and lightly spraying it with non-stick cooking spray.
- In a large mixing bowl, combine the red velvet cake mix, melted butter, and eggs until smooth.
- Gently fold in half of the M&Ms into the batter.
- Pour the mixture into the prepared pan, spreading it evenly, then sprinkle the remaining M&Ms on top.
- Bake for 15-20 minutes or until slightly soft but set in the middle. Allow to cool for about 30 minutes before slicing into squares.
Nutrition
- Serving Size: 1 serving
- Calories: 180
- Sugar: 12g
- Sodium: 85mg
- Fat: 8g
- Saturated Fat: 4g
- Unsaturated Fat: 3g
- Trans Fat: 0g
- Carbohydrates: 25g
- Fiber: 1g
- Protein: 2g
- Cholesterol: 40mg