Traditional Strawberry Upside Down Cake
There’s something utterly magical about a Traditional Strawberry Upside Down Cake; it’s not just a dessert, it’s a cherished memory wrapped in sweetness and warmth. As I reflect on my childhood, I can almost hear the laughter echoing through my mother’s kitchen every summer, where she would whip up this delightful cake whenever we had an abundance of fresh strawberries. The aroma of vanilla mingling with ripe, juicy strawberries always filled the air, creating an intoxicating invitation that was impossible to resist. I remember the anticipation of flipping the warm cake over to reveal its stunning crown of glistening fruit, like unveiling a precious treasure. Each slice is not merely a piece of cake but an experience that transports you back to sun-soaked afternoons spent with family and friends, sharing stories and laughter over homemade treats.
What truly sets this Traditional Strawberry Upside Down Cake apart from any other dessert is how it bridges generations and traditions while being incredibly simple to make. It encapsulates everything I love about cooking — the ability to take humble ingredients and transform them into something profoundly satisfying. The luscious strawberries become caramelized jewels under a tender cake that is moist yet light, offering a symphony of flavors with each bite. Trust me when I say this isn’t just another dessert; it’s a heartfelt creation that speaks to the beauty of summer and the joy of sharing food with loved ones. Whether you’re celebrating a special occasion or simply wanting to treat yourself on a sunny day, this cake promises to delight your taste buds and warm your soul.
Traditional Strawberry Upside Down Cake: A Slice of Summer Bliss
Let’s dive into making this beloved family recipe together! With every step, I’ll guide you through the process, sharing little secrets along the way that will ensure your cake turns out perfectly every time. This isn’t just about following directions; it’s about embracing the joy of baking and letting your kitchen come alive with the scents and sounds of creation!
Ingredients:
As we embark on this delightful culinary journey together, let’s take a moment to appreciate each ingredient that plays a pivotal role in crafting our Traditional Strawberry Upside Down Cake. Each element contributes its own unique flavor and texture, forming a harmonious blend that makes this cake unforgettable.
- 1/2 cup white sugar. This sweet granule is not just for flavor; it works wonders in both enhancing the natural sweetness of our strawberries and contributing to the cake’s structure. Sugar helps retain moisture while providing that delightful golden crust as it caramelizes during baking. When choosing sugar, opt for granulated white sugar for its purity; avoid brown sugar here since we want that clean sweetness without added molasses undertones.
- 2 large eggs. Eggs are absolutely paramount in this recipe as they provide structure and stability to our cake while adding richness. The proteins in eggs help bind all our ingredients together, creating that lovely lift we desire in baked goods. Always choose fresh eggs; if you can find farm-fresh ones, even better! They contribute not only superior flavor but also vibrant color.
- 3 tbsp melted butter. Butter infuses our cake with unreal flavor and moisture; it plays a crucial role in creating that soft crumb we’re after. Make sure it’s melted but not overly hot when you add it — if it’s too hot, it can cook your eggs prematurely when mixed in! For an extra layer of richness, consider using high-quality unsalted butter.
- 1 tsp vanilla extract. Ah, vanilla — often considered the soul of baking! This fragrant liquid gold adds depth and warmth to our cake’s flavor profile. Always opt for pure vanilla extract rather than imitation varieties; the difference is night and day! If you really want to elevate your cake’s essence, try using vanilla bean paste or scraping seeds from an actual vanilla bean pod.
- 3/4 cup buttermilk. Buttermilk is one secret ingredient that keeps our cake tender and moist while adding subtle tanginess that beautifully complements the strawberries’ sweetness. You can easily make buttermilk at home by adding one tablespoon of vinegar or lemon juice to three-quarters cup of milk; let it sit for about five minutes before using.
- 1 1/2 cups self-rising flour. This flour blends all-purpose flour with baking powder and salt — perfect for cakes! Using self-rising flour simplifies things by eliminating separate leavening agents while ensuring an even rise throughout our batter. If you don’t have self-rising flour on hand, you can create your own by mixing 1 1/2 cups all-purpose flour with 2 teaspoons baking powder and 1/2 teaspoon salt.
- 4 cups sliced strawberries. Fresh strawberries are the star here! Their natural sweetness transforms into succulent juiciness as they bake down into luscious layers atop our fluffy cake base—like nature’s candy! When selecting strawberries, look for firm berries with vibrant color; avoid those with bruises or mold as they won’t offer the best flavor or texture.
- 4 tbsp melted butter (for topping). This additional melted butter becomes part of our glaze when combined with sugar at the bottom of our pan, allowing those beautiful strawberries to caramelize perfectly as they bake into their syrupy goodness!
- 1/3 cup granulated sugar (for topping). This sugar combines with melted butter to create a sweet coating for our strawberries as they cook down in their juices — think of it as nature’s version of dessert magic! The key here is to sprinkle evenly over those gorgeous sliced strawberries so they get enveloped in delicious syrup.
With these ingredients gathered lovingly together, we’re ready to create something extraordinary!
Equipment You’ll Need:
Having the right tools at hand makes all the difference when working on any recipe — think of them as essential partners in your culinary adventure! While they may not be edible themselves, each piece will help you achieve success and make your experience smoother and more enjoyable.
- 9-inch round cake pan: A sturdy round pan helps promote even heat distribution during baking so your cake rises beautifully without any raw centers or burnt edges! If you don’t have one on hand, consider using an 8-inch pan but keep an eye on bake time since smaller pans can cook faster.
- Mixing bowls: You’ll want a couple of these versatile bowls—one for combining dry ingredients like flour and sugar and another for wet ingredients such as butter and eggs (this keeps everything organized!). Opt for glass or stainless steel options which hold up well against heat if needed later!
- Whisk or electric mixer: Whisks are perfect for manually blending together ingredients like melted butter into eggs—plus there’s something therapeutic about whipping everything by hand! However, if time is short or you’re feeling lazy (we’ve all been there!), reach for an electric mixer instead; it’ll make quick work outta those mixing tasks!
- Rubber spatula: This handy tool will help scrape down sides while mixing batter effectively without leaving anything behind—trust me; nobody wants clumps when enjoying their slice!
With these tools assembled around you like trusty companions on this baking journey ahead… let’s roll up those sleeves!
Preparing the Traditional Strawberry Upside Down Cake
Step 1: Prepping Your Pan Like a Pro
Before diving into mixing batters or slicing strawberries—let’s focus on preparing our pan first since this step is crucial! Start by preheating your oven to 350°F (175°C), ensuring it’s nice and hot before placing anything inside—it creates an ideal environment for rising cakes! Next up comes greasing your round cake pan generously with some melted butter (about two tablespoons should do). This non-stick layer ensures easy release post-bake along with beautifully browned edges once flipped over later—a must-have feature! Then sprinkle about half of that granulated sugar evenly across the bottom before layering those sliced strawberries like little red hearts—they should cover every inch so every bite brings forth their sweet juices during baking!
Step 2: Creating Your Batter Bliss
Now onto what really brings everything together: making our batter! In a large mixing bowl (the kind you’d be happy enough to use daily), whisk together those two large eggs until they’re frothy—this aeration process helps create fluffiness within our final product which makes each slice lighter than air! Gradually pour in three tablespoons of melted butter alongside one teaspoon vanilla extract—you’ll notice how these fragrant additions elevate everything already happening within this bowl! Next comes adding three-fourths cup buttermilk gradually while stirring continuously until fully incorporated—a creamy mixture starting to form here will ensure moistness throughout every bite later on when baked correctly—it truly makes all difference possible when working with cakes!
Step 3: Combining Dry Ingredients
In another bowl (yes again!), grab one-and-a-half cups self-rising flour along with half-a-cup white sugar—we want sweet notes mingling seamlessly amongst dry elements here too after all… Use either whisking motion or spatula methodically folding everything together gently until no dry patches remain visible anymore—you’re looking for uniformity now where nothing sticks out oddly compared against rest batter mixture-wise—the goal being smooth consistency free from lumps before continuing forth!
Step 4: Merging Wet & Dry Elegance
Now let’s join forces between wet mixtures created earlier & dry duo awaiting patiently nearby… Pour wet contents straight into dry bowl containing flour mixture then use rubber spatula gently folding until just combined—that means stop stirring once seen fully blended because overmixing leads tough results—yuck! Allowing small lumps still present signals good health towards texture meant achieved within end product itself… Trust me when I say patience pays off here—it’ll reward us later once transformed magically during bake time ahead!
And there we go—those initial steps set us on course towards crafting this beloved Traditional Strawberry Upside Down Cake worthy sharing among loved ones soon enough… Get ready because next up involves pouring batter into prepared pan followed by setting timer patiently waiting while aromas fill air around kitchen soon enough… Stay tuned my friend—the best is yet come!
The Joy of Preparing Your Traditional Strawberry Upside Down Cake
Step 5: Create the Sweet Bed of Strawberries
Now that you have your cake batter all mixed and ready, it’s time to prepare the star of our show—those luscious strawberries! This step is critical, as the way we treat our strawberries will set the stage for the entire cake. Start by washing your four cups of fresh, ripe strawberries under cool running water. Pat them dry gently with a kitchen towel; we don’t want any excess moisture diluting their natural sweetness. Then, slice these beauties into thick halves or quarters, depending on your preference. Trust me when I say that the thickness matters! You want them to be substantial enough to hold their shape during baking while still becoming wonderfully soft and juicy.
Next, in a medium mixing bowl, combine your 4 tablespoons of melted butter with 1/3 cup of granulated sugar. Stir until they form a smooth paste—this mixture is going to become the liquid gold that infuses flavor into our strawberries as they caramelize during baking. Pour this buttery goodness into the bottom of your greased cake pan, spreading it evenly across the surface. Now comes the fun part: arrange those strawberry slices in a beautiful pattern over this mixture. You can be creative here! Whether you opt for a circular design or a more whimsical arrangement, remember that whatever you create will be what greets you when you flip the cake upside down later on. Take a moment to admire your handiwork; it’s like an edible work of art waiting to come alive in the oven!
Step 6: Combine Your Batter to Perfection
Now let’s get back to that delightful batter we prepared earlier! Gently pour it over your arranged strawberries in the cake pan. It’s essential to pour slowly and evenly so that all those sweet strawberries are lovingly embraced by the batter rather than disturbed by its landing. This is crucial because if you rush this step, you might disrupt those beautiful layers you’ve just created—a fate none of us want for our masterpiece! Use a spatula to spread the batter evenly across the surface if needed, ensuring no strawberry slice is left exposed.
Why does this matter? Well, an even batter ensures that every bite will be moist and flavorful while providing stability as it bakes. Plus, giving your batter some tender love and care allows it to rise uniformly, leading to an irresistible texture that is both fluffy and decadent when baked! Once satisfied with how it looks (and trust me, you’ll feel proud!), it’s time to pop the pan into a preheated oven set at 350°F (175°C). Bake your cake for about 50 minutes or until it turns a glorious golden brown hue and springs back lightly when touched—this visual cue is one of those non-negotiable signs that indicate doneness.
Step 7: The Magic Moment – Cooling Down
Once you’ve achieved that lovely golden color and delightful aroma fills your kitchen like an embrace from an old friend, remove your cake from the oven with great excitement—but hold on just a moment before diving in! Allowing it to cool in the pan for about 10-15 minutes may feel like torture because you can almost taste that sweet strawberry goodness already! But trust me on this: allowing it to rest is profoundly satisfying for two reasons.
First, this cooling period helps prevent breakage when flipping it out; cakes are sensitive souls and need a moment to relax after being subjected to heat. Secondly, letting it cool slightly allows those juices from the strawberries sitting at the bottom (that lovely butter-sugar mixture) time to thicken up just enough so they don’t run everywhere when you flip—this means less mess and more stunning presentation when serving! So take deep breaths during those ten minutes; pour yourself some tea or coffee while you wait—it’s part of cultivating patience that pays off beautifully.
Step 8: Flipping Your Cake – The Grand Reveal
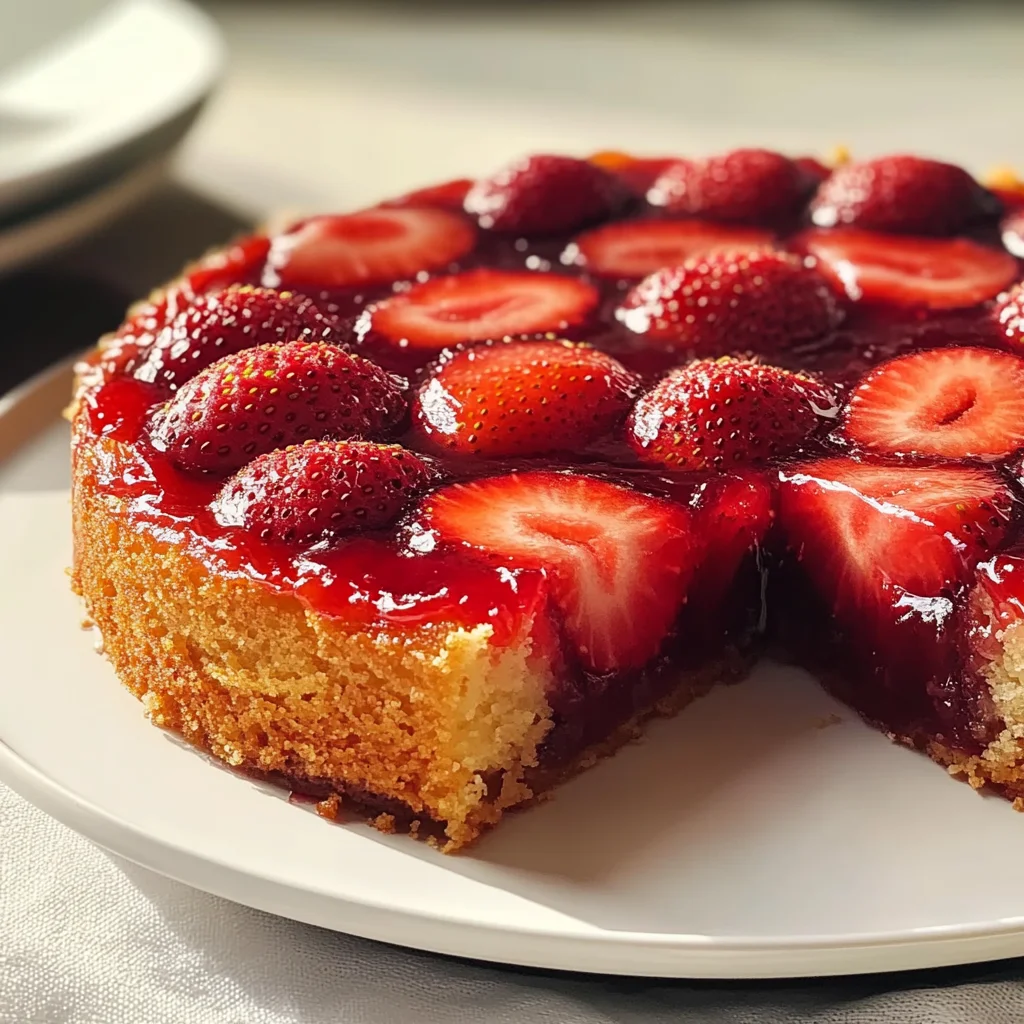
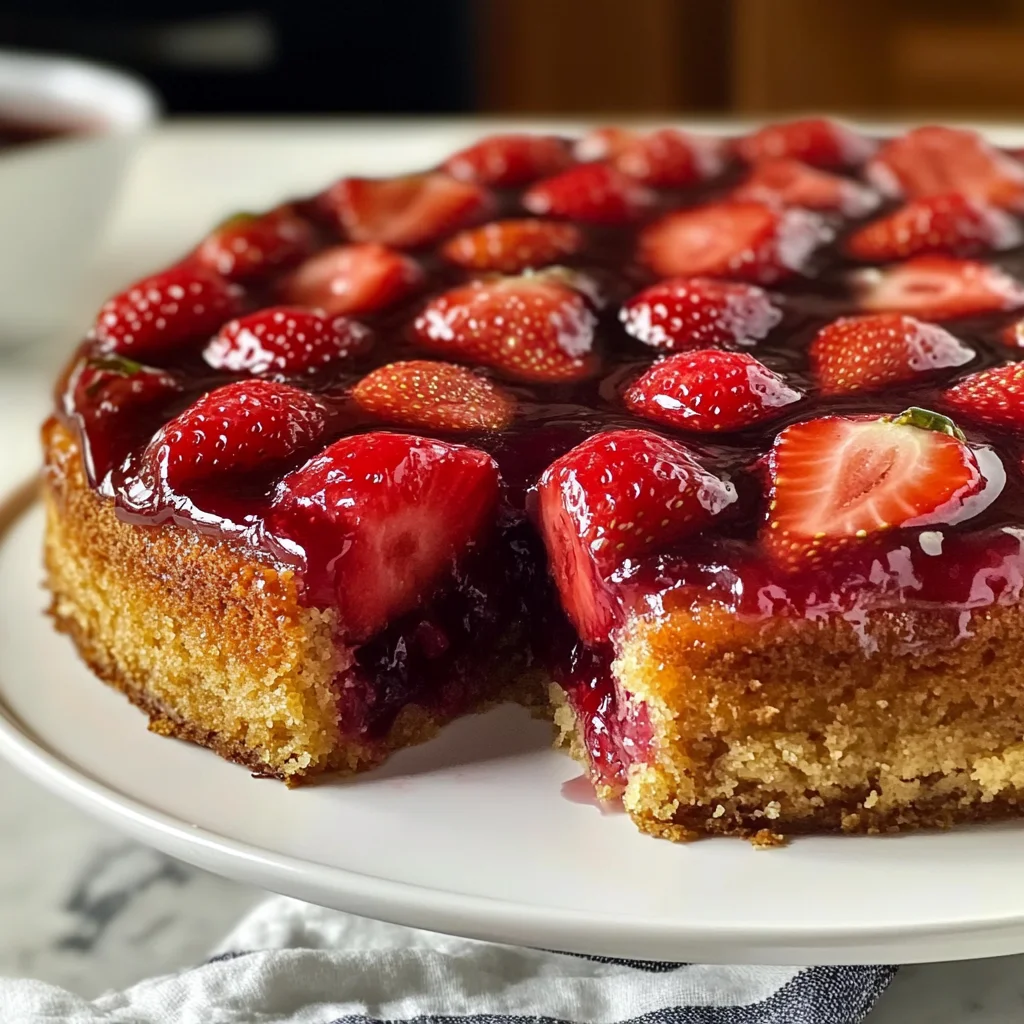
Here comes arguably one of my favorite parts—the grand reveal where your Traditional Strawberry Upside Down Cake transforms right before your eyes! After allowing your cake its much-deserved cooling period in the pan, place a large plate over the top of your cake pan—make sure it’s larger than your pan so there’s no risk of spillage later on. With both hands firmly gripping both plate and pan (it can get slippery!), carefully invert them together so that your cake lands softly onto the plate.
As you lift off the pan, prepare for pure magic! Those strawberries should now grace the top of your cake in all their glory—glistening under their sugary glaze like jewels on velvet fabric. If something doesn’t turn out quite right—don’t sweat it! Just use a spatula or knife to reposition any stray berries; they often need gentle coaxing back into place after being flipped around so dramatically. This step can feel nerve-wracking yet utterly exhilarating all at once—it’s proof that cooking is not just about following steps but also about embracing creativity and having fun along with occasional hiccups!
Final Touches – Serving Your Masterpiece
Step 9: The Whipped Cream Finish
Now that you’ve successfully flipped over this gorgeous creation, let’s take things up another notch with a delightful touch of homemade whipped cream! While store-bought options are certainly convenient, there’s truly something extraordinary about making whipped cream from scratch—it’s airy lightness and fresh sweetness elevates any dessert experience beyond compare. In a chilled mixing bowl (chilling helps keep everything fluffy), beat one cup of heavy cream with two tablespoons of sugar until soft peaks form—a process which usually takes around three minutes if using an electric mixer on medium speed.
Watch closely as those bubbles begin forming—the moment soft peaks appear means you’re nearly there! Be careful not to overwhip; otherwise you’ll end up with butter instead of fluffy cream (and trust me—you don’t want that!). Once done whipping up this cloud-like topping, serve generous dollops alongside each slice of warm-upside-down strawberry goodness.
And there you have it—the culmination of patience, love for cooking, and a sprinkle (or two!) of creativity resulting in what I wholeheartedly believe is one truly exquisite Traditional Strawberry Upside Down Cake! As you savor each bite alongside friends or family members who gather around marveling at its beauty together—know that this isn’t just food; it’s memories waiting to be made and shared for generations to come. Enjoy every last morsel—you’ve earned it!
Storage and Enjoyment Tips for Your Traditional Strawberry Upside Down Cake
Ah, the moment has finally arrived! You’ve poured your heart into this Traditional Strawberry Upside Down Cake, and now it’s time to indulge in the fruits of your labor. The warm aroma wafting through your kitchen is simply intoxicating, and as you flip it over, revealing that stunning layer of glistening strawberries, you can hardly contain your excitement. But wait! Before you dive in, let me share some essential tips for preserving this delightful creation so you can enjoy it even longer.
Storing Leftover Traditional Strawberry Upside Down Cake
To keep your cake fresh and utterly delicious, I recommend storing any leftovers in an airtight container. This is crucial because it protects the cake from drying out and ensures that those luscious strawberries remain juicy. Ideally, place the container in the refrigerator where it will stay good for about 3-4 days. If you want a little pro tip to maintain that delicious moisture, consider placing a slice of bread in the container; it absorbs excess air and keeps everything beautifully soft! After storage, you’ll find that the flavors meld even more profoundly—each bite becomes a little celebration of sweet strawberries and buttery cake goodness. When you’re ready to enjoy another slice, simply pop it into the microwave for about 10-15 seconds or let it come to room temperature on its own—trust me, either way, you’re in for a treat!
Freezing Your Traditional Strawberry Upside Down Cake for Later
Now, if you’ve made more than you can handle (which is often the case!), freezing your Traditional Strawberry Upside Down Cake is an excellent option. To freeze it properly, first let the cake cool completely before wrapping individual slices tightly in plastic wrap or aluminum foil. Then place them in a heavy-duty freezer bag or an airtight container to prevent freezer burn. This method will keep your cake fresh for up to three months—yes, three whole months of strawberry bliss waiting just for you! When you’re ready to enjoy a slice from frozen, simply remove it from the freezer and allow it to thaw at room temperature for about an hour or reheating gently in the microwave as mentioned earlier. What makes this so fantastic is not only the convenience but also knowing that when a craving strikes—or when surprise guests drop by—you have this homemade delight ready to impress!
Traditional Strawberry Upside Down Cake

Indulge in the delightful taste of Traditional Strawberry Upside Down Cake, a perfect summer dessert that captures the essence of sunshine and sweetness. This charming recipe transforms fresh, juicy strawberries into a luscious topping that caramelizes beautifully over a tender, moist cake. Ideal for gatherings or cozy evenings at home, each slice offers a nostalgic bite of joy, reminiscent of cherished family memories. The combination of buttery cake and succulent fruit creates a tempting treat that everyone will love. With simple ingredients and easy-to-follow steps, this dessert is not only delicious but also a wonderful way to celebrate summer’s bounty.
- Prep Time: 20 minutes
- Cook Time: 50 minutes
- Total Time: 1 hour 10 minutes
- Yield: Approximately 10 servings 1x
- Category: Dessert
- Method: Baking
- Cuisine: American
Ingredients
- 1/2 cup white sugar
- 2 large eggs
- 3 tbsp melted butter
- 1 tsp vanilla extract
- 3/4 cup buttermilk
- 1 1/2 cups self-rising flour
- 4 cups sliced strawberries
- 4 tbsp melted butter (for topping)
- 1/3 cup granulated sugar (for topping)
Instructions
- Preheat your oven to 350°F (175°C) and prepare a 9-inch round cake pan by greasing it with melted butter.
- Sprinkle half of the white sugar evenly in the bottom of the pan and layer with sliced strawberries.
- In a large mixing bowl, whisk together eggs until frothy. Gradually add melted butter and vanilla extract; mix well.
- Stir in buttermilk until fully incorporated.
- In another bowl, combine self-rising flour and remaining white sugar. Gradually fold dry ingredients into wet mixture until just combined.
- Pour the batter over the arranged strawberries in the pan.
- Bake for about 50 minutes or until golden brown and a toothpick inserted in the center comes out clean.
- Allow to cool for 10-15 minutes before flipping onto a serving plate.
Nutrition
- Serving Size: 1 serving
- Calories: 285
- Sugar: 23g
- Sodium: 160mg
- Fat: 10g
- Saturated Fat: 5g
- Unsaturated Fat: 5g
- Trans Fat: 0g
- Carbohydrates: 43g
- Fiber: 1g
- Protein: 4g
- Cholesterol: 67mg