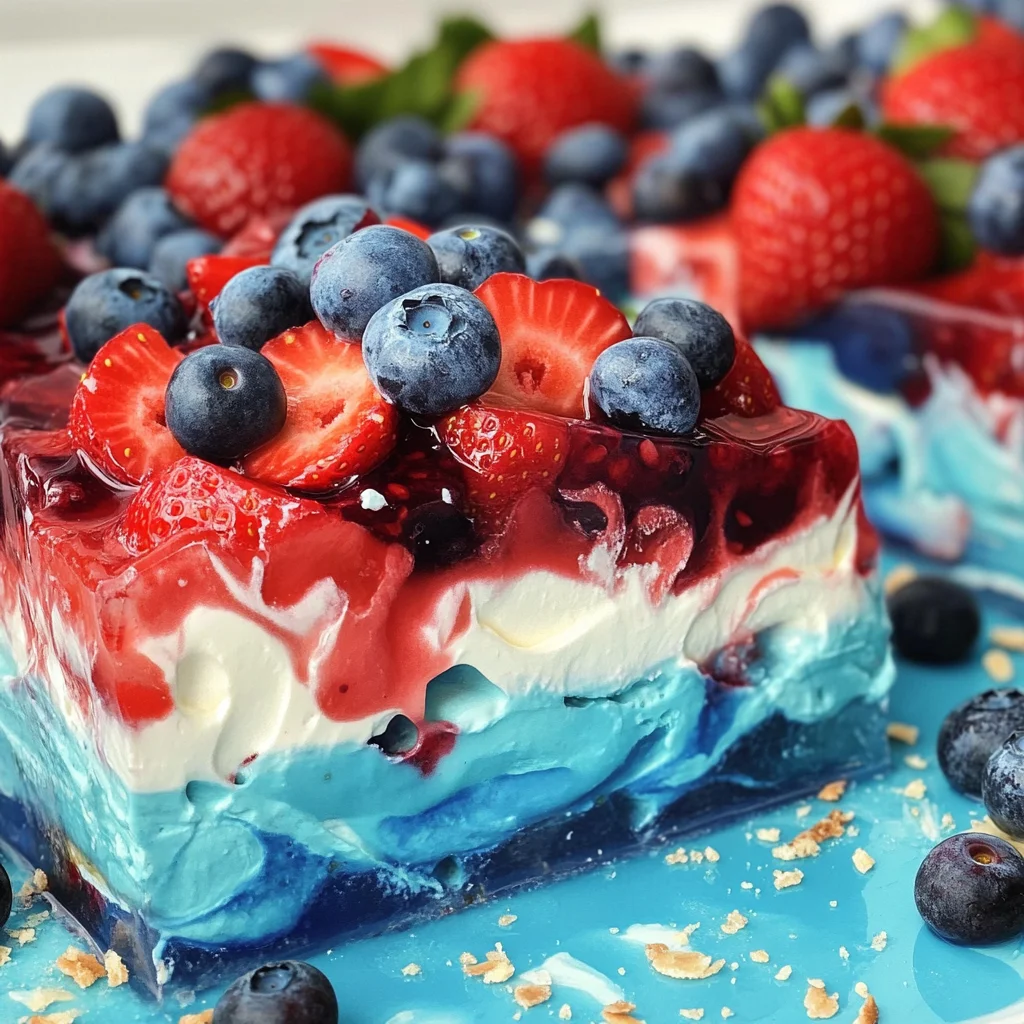
Summer Berry Jello Lasagna
There’s something utterly enchanting about summer, isn’t there? The warm sun kissing our skin, the sweet fragrance of blooming flowers wafting through the air, and those delightful moments spent outdoors with family and friends. But let me tell you, nothing captures the essence of summer quite like a bright, vibrant dessert that feels like a celebration on a plate. Allow me to introduce you to the Summer Berry Jello Lasagna—a truly extraordinary treat that’s not just about taste; it’s about experience. This no-bake wonder is layered with luscious berries and creamy goodness, creating a symphony of flavors that dance on your palate. Each bite is a reminder of sunny picnics, laughter-filled gatherings, and cherished memories.
What makes this recipe even more special is its versatility. It marries tradition with innovation, taking classic layered desserts to new heights while keeping it light and refreshing. Imagine the joy of serving this beautiful creation at your next barbeque or family reunion—it’s bound to be the star of the table! I promise you, every layer tells a story—of indulgence without guilt and refreshment without heaviness. Whether you’re enjoying a quiet evening on your patio or hosting a festive gathering, this Summer Berry Jello Lasagna will be the perfect companion for all your summer adventures.
Summer Berry Jello Lasagna: A Refreshing Slice of Summer
Grab your mixing bowls and get ready to embark on a delightful culinary journey! This Summer Berry Jello Lasagna is an effortless yet impressive way to treat yourself and your loved ones. With layers of creamy goodness interspersed with bursts of fresh fruit, it’s like capturing summer in every slice. Let’s dive into what you’ll need to create this masterpiece!
Ingredients:
As we begin our adventure in making this festive dessert, let’s take a moment to appreciate each ingredient that plays a pivotal role in our Summer Berry Jello Lasagna. Each one adds not only flavor but also texture and vibrancy to our dish.
- 36 Golden Oreo cookies. These delightful cookies form the foundation of our lasagna crust—crunchy yet sweet with their golden hue that perfectly complements the bright berries above. The unique flavor profile of Golden Oreos adds an unexpected twist compared to traditional chocolate cookies, which can overpower lighter flavors. When crushing them into fine crumbs, take care not to leave any large chunks; they should meld beautifully with butter for a seamless crust.
- ½ cup unsalted melted butter. This ingredient is crucial for binding the cookie crumbs together into a cohesive crust that stands strong against the luscious fillings above. Using unsalted butter allows us to control the saltiness in our dessert perfectly—this balance is absolutely paramount when layering sweet flavors later on. When melting your butter, aim for it just to be liquid gold; if it starts bubbling too much or browning, let it cool before mixing it with your crumbs.
- 2 Tablespoons red sprinkles (optional), 2 Tablespoons white sprinkles (optional), 2 Tablespoons blue sprinkles (optional). While sprinkles are optional here, they add an element of fun and festivity—especially if you’re serving this around Independence Day or any summer celebration! They provide pops of color that elevate not just the visual appeal but also enhance that playful spirit we all crave during warm months. Choose high-quality sprinkles as they hold their color better; nobody wants drab looking layers!
- 6 oz. sweetened berry blue vegan gelatin. This vibrant gelatin layer brings both flavor and texture into play—it creates that iconic jiggly characteristic that’s beloved in any jello dish while being completely plant-based! The berry blue flavor adds a fruity punch that contrasts beautifully with fresh fruits in our layers. Make sure you’re using sweetened gelatin for optimal taste; if using an unflavored variety instead for some reason, consider adding sugar or another form of sweetness.
- 2/3 cup boiling water. Boiling water is essential for dissolving gelatin properly—you’ll want it piping hot to ensure everything blends smoothly without any gritty bits remaining in your mixture. Stirring well here allows all those wonderful flavors from the gelatin to activate fully; trust me when I say this step sets up success for later layers.
- ½ cup Greek yogurt (cold). This creamy addition provides not only richness but also tanginess that balances out all the sweetness throughout our dessert beautifully! Using Greek yogurt lends some protein too—a little nod towards making dessert feel almost virtuous! Be sure it’s cold before incorporating it so it blends seamlessly with other ingredients rather than clumping up awkwardly.
- 1 ½ cups fresh blueberries. Fresh blueberries are nature’s candy—they burst with juicy flavor while providing antioxidants too! Their vibrant color adds beauty as well as taste depth in each layer they inhabit alongside creamy mixtures below them! When selecting blueberries at your market or store, look for plump berries with smooth skins—these are signs of freshness!
- 8 oz. cream cheese (softened). Softened cream cheese is key here—it gives us that wonderfully rich layer we love in desserts while marrying perfectly into other components like whipped cream later on! It’s best when left out at room temperature until softened for ease during mixing; this way you avoid lumps ruining such smooth textures!
- ½ cup powdered sugar. Sweetness comes from powdered sugar which dissolves easily compared alongside granulated options thereby allowing us fast incorporation into cream cheese without graininess ruining mouthfeel! Plus its finely milled consistency helps achieve silky textures rather than gritty bites—definitely non-negotiable if we want perfection!
- 1 teaspoon vanilla. Ahh…the magic touch! Pure vanilla extract elevates flavors across all components—it somehow brings everything together harmoniously while adding warmth underneath those bright notes from berries above! Always opt for pure over artificial varieties whenever possible—the difference speaks volumes once tasted!
- 1 ¾ cups whipped cream (Cool Whip or homemade whipped cream). Whipped cream acts as our lightest layer offering airiness within dessert alongside pleasant sweetness but also crucial volume too! If going homemade route ensure heavy cream gets whipped enough until stiff peaks form; don’t rush this step as under-whipping yields sad results!
- 6 oz Strawberry Jello. Like its berry blue counterpart earlier mentioned strawberry jello introduces another beautiful dimension featuring intense fruity flavors paired nicely against fresh strawberries layered atop it later on! Make sure it’s sweetened appropriately since we want balanced harmony across board throughout entire dessert experience!
- 1 ¼ cups boiling water + ¾ cup iced water. This unique combination allows us to bloom strawberry jello properly before incorporating ice-cold water which helps create firm set structure once cooled down later; trust me when I say balancing temperatures yields perfect gelling results every time!
- 4 cups sliced strawberries: Fresh strawberries bring brightness not only visually but also taste-wise—they pair so beautifully against creamy elements found within lasagna itself while offering contrasting textures too whether nestled between other fruits or simply laid atop layers waiting patiently until served up by eager guests digging in eagerly…
- 2 cups whipped cream (Cool Whip or homemade whipped cream): Just like before we see whipped cream again appearing here offering wonderful airy qualities needed when topping off final product ensuring each bite remains light despite indulgent nature present within elsewhere around plate…
- Red, white and blue sprinkles/stars confetti: Last touches matter greatly—these final decorations add whimsical flair enhancing overall appearance ensuring everyone knows this dish was made special just for them showcasing pride therein celebrating summertime festivities together!
Equipment You’ll Need:
Now that we’ve gathered all these lovely ingredients together let’s talk about what tools will help make our creation come alive in your kitchen! Having the right equipment not only simplifies processes but also enhances enjoyment while crafting something truly magical.
- Mixing Bowls: A good set of mixing bowls is essential—they allow you space needed during different stages without cluttering counters unnecessarily! Opt for glass or stainless steel since they resist staining over time especially important when working with colorful ingredients like jello which can leave behind residue otherwise difficult clean after event has passed…
- Electric Mixer: An electric mixer saves time significantly during processes involving whipping creams/cheeses yielding fluffy results faster than doing everything manually by hand would require instead—a must-have ally when preparing grand desserts such as these where achieving certain textures proves vital!
- Measuring Cups & Spoons: Precision matters immensely whenever baking/cooking thus having accurate measuring tools becomes paramount—always invest wisely within quality sets ensuring durability lasts long past first use keeping future creations just as successful thereafter…
- Spatula: A sturdy spatula aids immensely blending mixtures together smoothly without leaving behind stubborn clumps hiding inside corners—you’ll love having one handy especially during layers assembly process where scraping down sides proves necessary frequently making sure nothing goes wasted ever along journey towards delicious outcome awaiting ahead!
Preparing the Summer Berry Jello Lasagna
Step 1: Crafting Your Crust
First things first—let’s conquer that delicious crust that’ll serve as our base layer! Take those Golden Oreo cookies and crush them into fine crumbs using either a food processor or placing them inside a zip-top bag and rolling over them gently with a rolling pin until finely ground—this process creates an ideal texture allowing buttery goodness bind everything together firmly once melted butter gets added next step onward ahead… Pour those lovely crushed cookies into a bowl then drizzle melted unsalted butter evenly overtop stirring gently until combined fully forming cohesive mixture resembling wet sand almost—not too dry nor overly moist ideal means achieving perfect firmness upon setting afterwards ensuring stability throughout remaining layers resting atop now waiting patiently until final assembly occurs down road shortly thereafter…
Step 2: Forming Your Crust
Once blended nicely pour mixture directly into an ungreased rectangular dish spreading evenly across bottom pressing down firmly using hands/spatula alike creating even compact surface preventing crumbling later on when slicing through finished product finally revealing beautiful cross-section beneath surface revealing stunning layers hidden underneath waiting eagerly unveil themselves moments after cut pieces served forth onto plates glistening invitingly inviting everyone nearby indulge wholeheartedly enjoy every bite savoring flavors mingling delightfully creating blissful experience shared amongst friends/family gathered round ready dive deep discover magic created herein…
Step 3: Creating That Blueberry Layer
Now let’s move onto crafting our first fruit-infused layer featuring berry blue vegan gelatin combined deliciously within boiling water stirring well until fully dissolved before allowing mixture cool slightly then folding cold Greek yogurt blueberry compote previously prepared alongside whisked-up cream cheese blended smoothly together adding confectioners’ sugar vanilla extract bringing forth sweetness balanced perfectly against tartness found within yogurt helping achieve depth complexity desirable across entire dish undeniably worth effort taken here—I assure you nothing less than extraordinary awaits once completed step follows suit unveiling luscious textured delight now resting patiently awaiting final touches layered atop eventually making its way served forth ready share beloved guests gathered round eagerly anticipating taste sensations await within…
Step 4: Assembling Layers
With every component meticulously crafted let’s dive headfirst assembling splendid masterpiece awaiting completion soon enough lifting spirits high around table filled laughter excitement palpable throughout atmosphere present surrounding eager participants willing explore uncharted territories tantalizing treats created lovingly shared amongst one another… Start layering blueberry filling atop prepared crust spreading evenly ensuring coverage reaches edges corner-to-corner leaving no gaps behind allowing successful melding occur gradually whilst building anticipation rising higher amongst guests seated nearby eager eyes gazing hungrily upon delectable sight unfolding right before their very own eyes…
Stay tuned as we explore further steps leading us closer toward ultimate indulgence crafted lovingly through meticulous processes designed ensure perfect outcome remembered fondly long after last morsel savored enjoyed thoroughly…
Step 5: Crafting the Creamy Layer of Delight
Now that you’ve prepared the base for your Summer Berry Jello Lasagna, it’s time to create that luscious creamy layer that will provide a perfect contrast to the vibrant fruit and jello layers. Start by softening 8 ounces of cream cheese. You want it to be at room temperature so that it blends smoothly—think of this as the foundation for a fluffy cloud of flavor. In a large mixing bowl, combine the softened cream cheese with ½ cup of powdered sugar and 1 teaspoon of vanilla extract. Using an electric mixer, beat these ingredients together on medium speed until you achieve a creamy, uniform consistency that looks almost like whipped butter—it should be light in color and completely free of lumps. This is crucial because we want every bite of your Summer Berry Jello Lasagna to be silky and smooth.
After you’ve achieved that dreamy texture, gently fold in 1¾ cups of whipped cream. Whether you choose to use store-bought Cool Whip or whip your own cream from scratch, make sure it’s light and fluffy—this is what will lift your dessert into the realm of the extraordinary! When folding, take your time—this isn’t just about mixing; you’re incorporating air into the mixture to keep it light and airy. Use a spatula and move from the bottom of the bowl upwards in a gentle motion, being careful not to deflate the whipped cream too much. Trust me on this—patience here pays off in spades when you taste the finished product!
Step 6: Assembling Your Berry Heaven
With your creamy layer ready to go, it’s time for one of my favorite parts: assembling your Summer Berry Jello Lasagna! Grab your prepared pan—if you’ve been following along, it should now have a beautiful crust made from those Golden Oreo cookies. Begin by spreading half of that luscious cream cheese mixture evenly over the crust. Use an offset spatula or simply the back of a spoon; just ensure that it goes all the way to the edges so every slice has equal deliciousness. This layer is essential because it acts as both a flavor enhancer and a barrier, keeping your delicious layers distinct while allowing them to meld beautifully over time.
Next up is the berry blue vegan gelatin! Remember that delightful berry blue gelatin we prepared earlier? Now’s its moment to shine! Pour half of this gelatin mixture over your beautifully spread cream layer and gently tilt your dish back and forth until it’s evenly distributed. This step is absolutely paramount—not only does it create an eye-catching visual effect with its vibrant color, but it also provides a refreshing tartness that pairs beautifully with the sweetness of the whipped cream and berries. Don’t rush this; let gravity do some work for you as you watch those colors blend ever so slightly at the edges—it’s like witnessing art unfold right in front of you!
Step 7: Layering on Fresh Blueberries
Now comes one of my favorite moments—the addition of fresh blueberries! These little gems are not just incredible in flavor; they also add delightful texture and nutrition to our dessert masterpiece. Sprinkle 1½ cups of fresh blueberries evenly across the berry blue gelatin layer. I always encourage my friends to use freshly washed blueberries—they should be plump, firm, and bursting with flavor! Feel free to nestle them into the gelatin slightly; this will help them stay suspended within layers as they set up beautifully in your Summer Berry Jello Lasagna.
Once you’ve scattered those luscious berries on top, let’s repeat! Pour another half of that creamy mixture right over those gorgeous blueberries—again using an offset spatula for even distribution if possible—and then follow up with another layer of berry blue gelatin on top. Oh my goodness, can you see how stunning this is already? The colors are coming together like a lively summer garden party on your plate! Make sure everything settles evenly before moving on; this patience ensures each bite is equally divine.
Step 8: The Strawberry Surprise
The pièce de résistance awaits us now—the strawberry layer! Prepare for an utterly intoxicating experience as we dive into creating this beautiful addition. Take out your package of strawberry vegan gelatin and combine it with 6 ounces (that’s one box) into 1¼ cup boiling water in a large bowl—you’ll want to stir until fully dissolved; no lumps allowed here! While it’s warm, add in ¾ cup iced water. Why chill? Well, cooling down helps set our beautiful strawberry jelly without cooking off any flavors or making it too thick too quickly.
Let’s make this layer sing by adding about 4 cups sliced strawberries right into that warm strawberry gelatin mixture while stirring gently—this allows each slice to soak up all those sweet flavors before they set! Once everything is combined nicely (you’ll see those strawberries starting to look glossy), pour this luscious concoction over our previously layered masterpiece carefully; take care not to disturb what’s underneath too much! Allowing each layer its own moment is key—the transformation happening here is nothing short of magical!
Final Touches: The Grand Finale
As we approach wrapping up our creation with generous flair, there’s one last crucial step before we can indulge: chilling our Summer Berry Jello Lasagna! Cover your dish loosely with plastic wrap (to prevent any condensation from ruining our lovely layers) and place it in the refrigerator for at least four hours—or even better if you can leave it overnight! Why such patience? Letting everything rest allows those vibrant flavors to meld beautifully together while ensuring all layers set properly—a harmonious symphony waiting patiently for their debut.
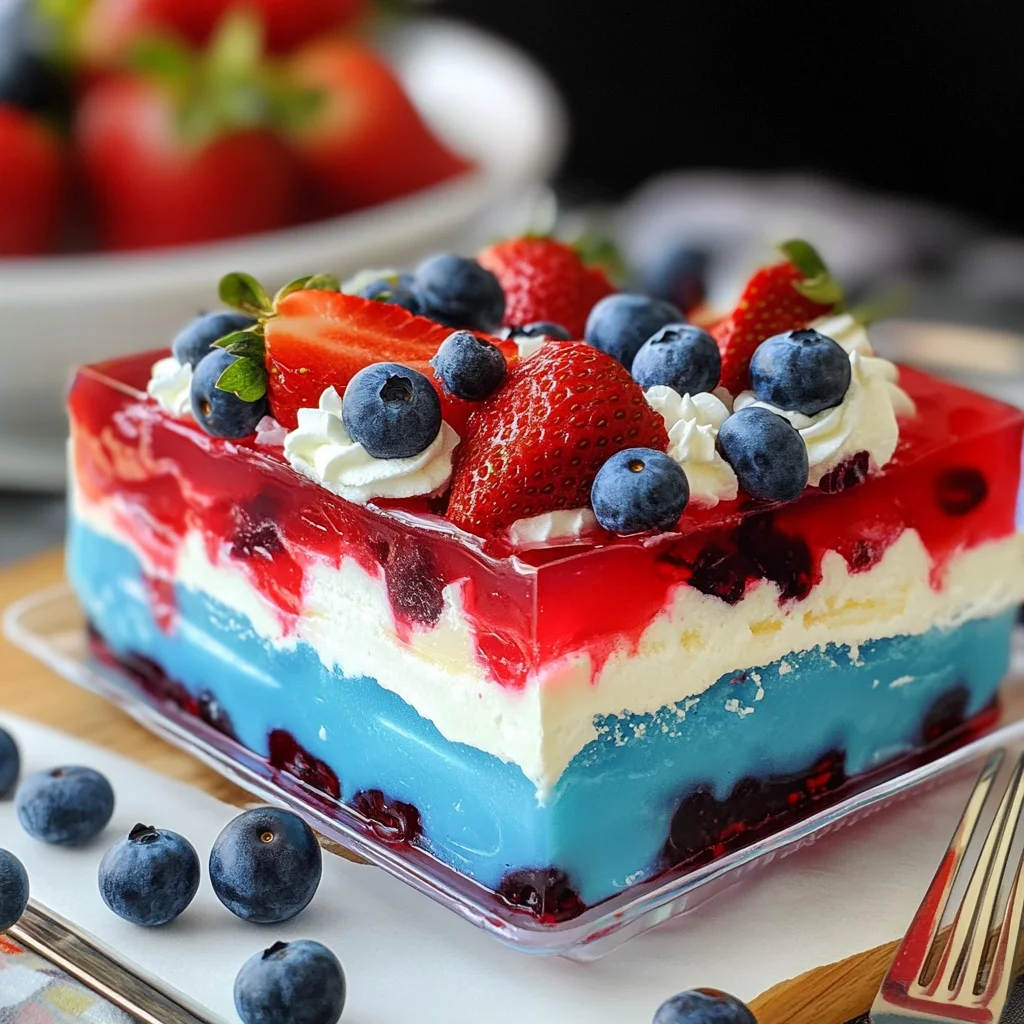
When you’re finally ready to serve this refreshing treat on a hot summer day (and believe me, nothing feels better), pull out that glorious dish from its cool hideaway and prepare yourself for compliments galore! Top with an additional dollop or two of whipped cream if desired and sprinkle on some red, white, and blue sprinkles or star confetti for an extra festive touch. Slice into squares and watch how effortlessly those layers reveal themselves—each piece showcasing a slice filled with color & joy!
I promise you—this Summer Berry Jello Lasagna will become an instant favorite among friends and family alike! So go ahead, celebrate those summer days with love infused into every bite! Enjoy every single moment spent preparing this delightful treat; after all, sharing food made from heartwarming memories makes each gathering truly extraordinary.
Storage and Enjoyment Tips for Your Summer Berry Jello Lasagna
Now that you’ve crafted this delightful Summer Berry Jello Lasagna, it’s time to let the excitement bubble over as you prepare to enjoy every luscious layer! This no-bake masterpiece is not only a treat for the eyes but also a refreshing indulgence that beckons to be shared with loved ones. However, if you find yourself with leftovers—though I can’t imagine there will be much of it—you’ll want to ensure it stays as delicious as when you first made it. Let’s chat about how to best preserve your masterpiece so it remains a showstopper for days to come!
Storing Leftover Summer Berry Jello Lasagna
When it comes to storing your leftover Summer Berry Jello Lasagna, choosing the right container is absolutely paramount. A tight-fitting glass or plastic container will keep your dessert fresh while guarding against any unwanted odors in the fridge. If you’re anticipating keeping it for more than a couple of days, I recommend covering it with a layer of plastic wrap directly on the surface of the lasagna before sealing the container; this little trick helps maintain its moisture and flavor. You can expect your colorful creation to stay deliciously intact for about 3-5 days in the fridge, although I promise you, it’s so good that you might find it disappearing much sooner! The flavors meld beautifully over time, enhancing that symphony of tastes with each bite. If you’re considering serving it again later, just remember: no need to reheat this beauty—serve it chilled straight from the fridge for that refreshing burst of flavor!
Freezing Components for Later
If you’re looking to extend the life of your Summer Berry Jello Lasagna even further, freezing is an excellent option! Individually wrapping slices in plastic wrap and then placing them in a freezer-safe container can help maintain quality. This method allows you to pull out just what you need whenever that craving strikes! When frozen properly, each slice can last up to two months without losing its enticing charm. To enjoy from frozen, simply transfer a slice to the refrigerator and let it thaw overnight—trust me, there’s something so satisfying about knowing a delightful treat awaits you after just a little patience! Freezing components separately also gives you flexibility; perhaps next time, you’ll want to experiment with different berries or flavors—how exciting is that? The convenience factor is fantastic here; imagine surprising guests with an unexpected dessert that feels fresh and special!
Summer Berry Jello Lasagna
Enjoy refreshing Summer Berry Jello Lasagna—a light no-bake treat perfect for summer gatherings! Try this easy recipe today!
- Prep Time: 30 minutes
- Cook Time: None
- Total Time: 0 hours
- Yield: Serves approximately 12 people 1x
- Category: Dessert
- Method: No-bake
- Cuisine: American
Ingredients
- 36 Golden Oreo cookies
- ½ cup unsalted melted butter
- 6 oz sweetened berry blue vegan gelatin
- 2/3 cup boiling water
- ½ cup cold Greek yogurt
- 1 ½ cups fresh blueberries
- 8 oz softened cream cheese
- ½ cup powdered sugar
- 1 teaspoon vanilla extract
- 1 ¾ cups whipped cream (Cool Whip or homemade)
- 6 oz strawberry vegan gelatin
- 4 cups sliced strawberries
Instructions
- Crush the Golden Oreo cookies into fine crumbs and combine with melted butter to form the crust. Press mixture into an ungreased rectangular dish.
- Dissolve berry blue vegan gelatin in boiling water; let cool slightly and fold in Greek yogurt, blueberries, cream cheese, powdered sugar, and vanilla extract. Spread half over the crust.
- Pour the remaining berry blue layer on top of the first layer. Add fresh blueberries after each layer.
- Prepare strawberry vegan gelatin with boiling water; fold in sliced strawberries, then pour over the last layer.
- Refrigerate for at least four hours or overnight before serving.
Nutrition
- Serving Size: 1 slice (150g)
- Calories: 280
- Sugar: 28g
- Sodium: 140mg
- Fat: 12g
- Saturated Fat: 7g
- Unsaturated Fat: 5g
- Trans Fat: 0g
- Carbohydrates: 40g
- Fiber: 2g
- Protein: 4g
- Cholesterol: 30mg